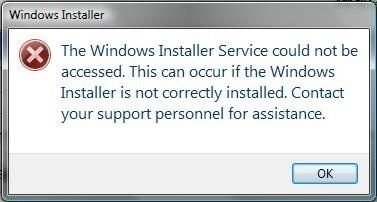
Windows Installer is a very important component of all Windows operating systems. It installs, uninstalls, and supports applications and software. If the Windows Installer is corrupted or the service stops for an unknown reason, an error message comes up. The error message typically appears as: “The Windows Installer Service could not be accessed. This can occur if Windows is running in safe mode or if the Windows Installer is not correctly installed. Contact your support personnel for assistance.”
The error message may happen when Windows XP is in Normal mode and the Windows Installer Service in Windows XP is damaged or unregistered. It can also occur if the default authentication level is set to None in the DCOM permissions and the default Impersonation level is on Anonymous. The error might also occur if the Windows Installer is attempting to access a folder or registry key that the system account does not have Full permission to access, but this occurrence is only NTFS-specific.
Methods Used to Fix “Windows Installer Service Could not be Accessed”
There are five specific methods used to fix the “Windows Installer Service Could Not Be Accessed” error message. The method to use depends on the specific issue. Before using these methods, verify that the service pack is installed. For Windows 2000, SP2 should be installed. For Windows NT 4.0, SP6 should be installed. The methods may not be effective if the appropriate service pack is not installed. Below is a list and description of the five methods used to fix the error message.
Method 1: Unregister and Re-register the Windows Installer
- Click Start then Run. Type MSIEXEC /UNREGISTER and click OK. It may look like nothing happens at this stage.
- Click Start then Run. Type MSIEXEC /REGSERVER then click OK. It still may look like nothing happens or an hourglass may appear.
- The method is complete. Attempt to use the Windows Installer application again.
Method 2: Verify the DCOM Permissions
- Click Start then Run. Type dcomcnfg and click OK.
- Go to the Default Properties tab. Click Connect in the Default Authentication Level list. Click Identify and click OK in the Default Impersonation Level list.
- Click Start then Run. Type explorer /select, %windir%\system32\msisip.dll and click OK.
- Rename the Msisip.dll file to Msisip.old.
- Reinstall the Windows 2000 Service Pack 3.
Method 3: Give Full Control Permission to the SYSTEM Account
- Start Windows Explorer. Right click the computer’s root hard drive. Click Properties.
- Click the Security tab then Add.
- Click the SYSTEM account in the Select Users, Computers, or Groups dialog box. Click Add then OK.
- Click to select the Full Control check box under Allow then click OK.
- Click the TEMP folder and confirm that the SYSTEM account has full control.
Important Note for Methods 4 and 5
Methods 4 and 5 both entail using the registry. It is extremely important to back up the registry before completing these methods because there is a possibility that all files will be deleted when modifying the registry. If the registry is backed up, then the files will be safe in case an error occurs.
Follow these steps to back up and restore the Windows registry:
- Click Start then Run. Type regedit into the Open box. Click OK.
- Click on this registry hive: HKEY_CLASSES_ROOT.
- Click Permissions in the Edit menu.
- Add SYSTEM to the Group or User Names list if it is not listed already then click Add.
- Verify that the local computer name is in the From this Location box.
- In the Enter the Object Names to Select box, type in system. Click OK.
- In the Group or User Names list, click SYSTEM.
- Under Allow in the Permissions for SYSTEM box, select the Full Control check box.
- Click Apply, click OK, and Exit the Registry Editor.
Method 4: Verify the Registry Permissions
- Click Start then Run and type Regedt32.
- Follow these steps for each of the registry hives:
a. Select the hive.
b. For Windows 2000 and Windows NT 4, click Permissions in the Security menu. For Windows XP, click Permissions in the Edit menu.
- Confirm that the SYSTEM account has been added and that the account has Full control. If the SYSTEM account does not have Full control, add the SYSTEM account with Full control.
Method 5: Fix the Broken Security Key for the MsiServer Service
- Start up the computer with Windows 2000.
- Click Start then Run and type regedit.exe.
- Rename the key below to Old_Security: HKEY_LOCAL_MACHINE\SYSTEM\CurrentControlSet\Services\MSIServer\Security
- Restart the computer.
- Run Instmsiw.exe for installer 2.0 again.


frederik
I just suggest to try “Long Path Tool” program
Error 628
While solving this issue error 628 pops up due to problems with your dial-up internet connection. But i fixed it by performing the following tasks:
Contact ISP to Check the Phone Line
Upgrade the Network Driver
Repair your Network Configurations
Reinstall Modem Device
Disable the Firewall Protection