Joining a network on Facebook is a great way to show one’s affiliation with a group of related individuals. Networks were initially intended to be used for affiliations with a current school or learning institution, but have since expanded into businesses and various other types of supported networks. Joining a network is simple and can be done quickly through the Facebook user interface.
It is important to join supported networks to give an upgraded experience with Facebook networking. In addition to being able to see friends’ profiles who have confirmed their friendship, one will be able to access the profiles of those in the network with which one is affiliated, while allowing the network to access one’s profile as well. This can also be controlled via Facebook’s privacy controls as well to help minimize access to one’s profile to those in the network.
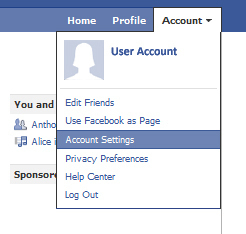
First, click the “Account” tab on the upper right corner of the Facebook page. This will open a drop down menu similar to the following example:

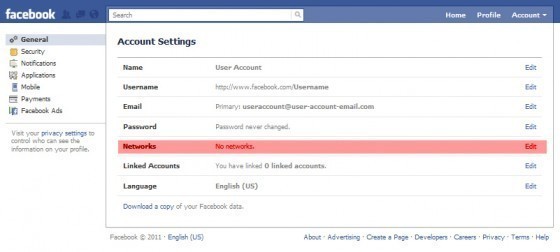
Select the “Account Settings” option within the drop down menu and allow the general settings page to load. The following is an example of the general settings page on Facebook:

The network section is highlighted on the image where one can click on edit to access the network section. Once it is open, one can provide a network name, which should open a list of the available supported networks that have been added to Facebook over time.

In this example, Harvard is being used as the school network that is being joined.

Once one has selected the network, one will be asked to verify network membership. This is done by providing a network email address that is associated with the network.

If it is a University network for example, Harvard, the email’s format would need to be firstname_lastname@harvard.edu if one is currently a student. If one was a student and applied for a post graduate email, then the format would be firstname_lastname@post.harvard.edu.
The same applies for most supported networks (such as workplace networks), with a requirement for verification. Once the verification email has been accepted, one needs to go to the email address that one provided and follow the additional steps included to complete the verification process.
In the event that one is trying to join a network that does not have a formal domain based email system, one needs to be friends with someone in the network who can help to verify that one is within the same network. Some networks require that one is within a certain age range. For example, High School students need to be at least 14 but fewer than 18 years of age to verify the graduating year of the student. In addition, fellow classmates need to confirm one’s network request affiliation.
There are a few networks that do not require an email verification and anyone can join them. Please note that joining a network that is open to everyone potentially allows unwanted access to one’s information via the network affiliation. It is important to ensure that the appropriate privacy settings are in place to help prevent strangers who join these networks from breaching one’s privacy.
Once a network has been added to one’s account, a primary network is displayed as the first means that people can use to find one’s location. For instance, if one’s name is Frank and one was part of the Harvard network, if someone typed “Frank” into the search and one was within his/her network then “Frank” would show up with the Affiliation of “Harvard” as a primary means of searching for those within a network. Since the other user is in the same Network, he/she has access to one’s extended profile details and may be able to access one’s wall and posts.


Scort Kao
i can’t even see “join a network” in my settings…