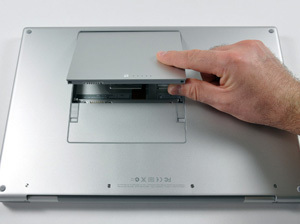
The battery that comes with the MacBook Pro will eventually need to be replaced as it is a consumable item with a finite usable life. The battery can be purchased directly from Apple Inc. or from a third party manufacturer. Only the batteries that Apple produce are really recommended as third party manufacturers may not produce quality batteries at lower prices. Purchasing the battery from Apple also allows the owner to get the service of having a new battery installed and the old one disposed of.
Anyone with access to a local Apple store can purchase and have a technician replace the battery in the store. This process will reduce the chances of the system being damaged and ensure that all of the parts are put back into place as they were.
In the event that someone needs to purchase a third party battery, he/she will be put to the task of installing said battery into the MacBook Pro manually. Since the MacBook Pro line of notebook computers are mostly unibody builds, they have a densely packed system underneath the case and extra care should be taken when replacing the battery manually.
There are three main reasons for replacing the battery manually:
Cost – Most batteries from a third party source are much cheaper than any option from Apple. Users could save 70% or more from some third party manufacturers and distributors.
Privacy – Some people may not trust an employee with their computer, thus the need for having full control over the installation process. Any unauthorized modifications to the system can also prompt them to not cover the system under warranty.
Warranty – The battery may have been defective but was not replaced within the warranty period. This means that the user would have to pay the full cost of the battery, installation, and disposal. This may not be an appealing option outside of the warranty coverage.
Manual Battery Replacement
Replacing a MacBook Pro battery manually does not take much work. It is possible to complete the process within a few minutes if done efficiently.
To replace the battery, the following tools are needed:
A Phillips #00 Screwdriver – This is a screwdriver that is small enough to fit all of the screws that will be removed from the MacBook Pro.
A Tri-wing Y1 Screwdriver – This is a specialty screwdriver that is small enough to fit the tri wing screws that will be removed from the MacBook Pro.
A Spudger tool (or other prying tool) – This is a tool that is designed to easily pry open the case and unsnap some of the secure case snaps on the MacBook Pro.
Multi Compartment sorting area (egg carton, ice cube tray, sticky tape) – Many screws will be removed from the computer and this item will be used to keep track of them efficiently.
MacBook Pro Unibody Battery – This is the battery that will be replacing the spent older battery in the system.
How to Replace a MacBook Pro Battery
1) Turn the MacBook Pro with the bottom facing up.
2) Remove the ten screws from the bottom of the lower case.
3) There will be two sets of three screws and one set of four screws. Sort them and place them into the multiple compartments sorting area.
4) Find the vent for the MacBook Pro and pull up on the lower case to begin to pry it open.
5) Use the Spudger tool to loosen the case and remove the lower case to expose the logic board.
6) Use the spudger to pry the battery connector out from within the socket on the logic board.
7) Disconnect the battery from the battery socket then separate the cables, taking care to ensure that the battery does not reconnect by touching the connector with the terminals.
8) Use the Tri-wing screwdriver to remove the two screws holding the battery in place.
9) Peel the battery warning label gently from the upper case. It is located near the optical drive. Keep the label on the battery and remove it from the enclosure. Use the pull tab on the battery to remove it from the enclosure.
10) Replace the battery with the new one and set it down into the enclosure similar to how the previous battery was.
11) Place the Tri-wing screws into their respective spots.
12) Connect the battery to the connector and ensure that the terminals are touching correctly. Place the connector into the logic board’s socket.
13) Slowly replace the bottom panel from the lower case and distribute pressure throughout it to ensure that it has gone back into the correct position.
14) Replace the ten screws that were removed from the back panel into their respective places.
15) Plug the MacBook Pro into a power outlet to allow the battery to charge. Charge it fully then discharge it and continue to cycle it this way whenever possible.
Note: Make sure to pay attention to the type of battery that goes inside the particular MacBook Pro. Different unibody MacBook models may require different batteries. Replacing the battery with the wrong size can cause issues such as starting a fire or sudden explosion from charging incorrectly.


Follow Us!