Computer users sometimes need to uninstall Java, for various reasons. In case of upgrading Java, you needn’t remove the previous version of Java. Instead, you can simply run the executable of the newer Java version and the upgrade will automatically happen.
However if you wish to uninstall Java, below are the methods for different platforms.
Uninstall Java from Windows
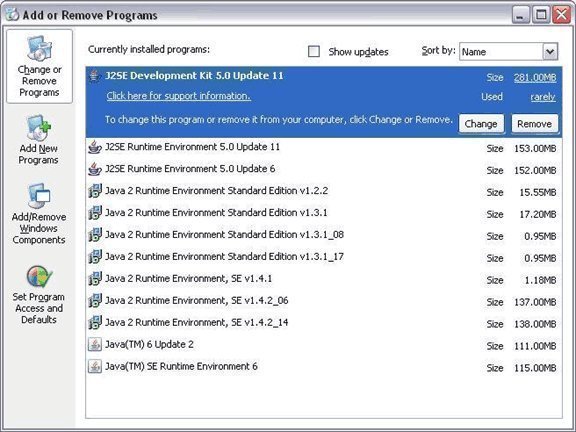
Since every installed program on Windows is usually listed in the Programs and Features section of the Control Panel, Java can be removed or uninstalled using the same.
- Click Start.
- Go toControl Panel.
- Select Programs and Features (Add/Remove Programs in the older versions of Windows).
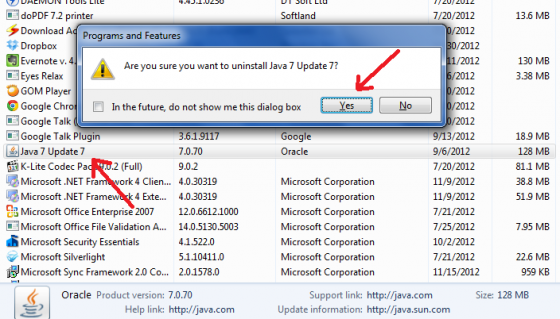
- Search for Java in the list of given programs. If found, select it and click the Uninstall button (click Remove in the older versions of Windows).
- Click Yes if asked for a confirmation. Click Allow if asked for permission.
- The uninstall wizard to remove Java will then guide you through the process.
(if asked, restart your computer for the changes to take effect)
Many a times, you may have uninstalled Java but the listing remains due to some registry entry. If that happens, below are the steps to completely remove the listing of Java.
Warning: Performing the below mentioned steps may lead to a crash if you don’t understand registry.
- Click the Start button
- Click the Run button
- Enter RunDll32 advpack.dll,LaunchINFSection java.inf,UnInstall and press the <RETURN>
- Click Yes
- Let the process reboot your machine
- Click the Start button
- Click the Run button
- Enter cmd and press <RETURN> to open a command shell
- Enter the command rd /s %System_Root%java
- Enter the command del %System_Root%infjava.pnf
- Enter the command del %System_Root%SYSTEM32jview.exe
- Enter the command del %System_Root%SYSTEM32wjview.exe
- Click the Start button

- Click the Run button
- Enter regedit and press <RETURN>
- Scroll down to HKEY_LOCAL_MACHINE
- Click + to open HKEY_LOCAL_MACHINE
- Scroll down to HKEY_LOCAL_MACHINESOFTWARE
- Click + to open HKEY_LOCAL_MACHINESOFTWARE
- Scroll down to HKEY_LOCAL_MACHINESOFTWAREMicrosoft
- Click + to open HKEY_LOCAL_MACHINESOFTWAREMicrosoft
- Scroll down to HKEY_LOCAL_MACHINESOFTWAREMicrosoftJava VM
- Click + to open HKEY_LOCAL_MACHINESOFTWAREMicrosoftJava VM
- Highlight Java VM
- Press the <DELETE> key
- Scroll down to HKEY_LOCAL_MACHINE
- Click + to open HKEY_LOCAL_MACHINE
- Scroll down to HKEY_LOCAL_MACHINESOFTWARE
- Click + to open HKEY_LOCAL_MACHINESOFTWARE
- Scroll down to HKEY_LOCAL_MACHINESOFTWAREMicrosoft
- Click + to open HKEY_LOCAL_MACHINESOFTWAREMicrosoft
- Scroll down to HKEY_LOCAL_MACHINESOFTWAREMicrosoftInternet Explorer
- Click + to open HKEY_LOCAL_MACHINESOFTWAREMicrosoftInternet Explorer
- Scroll down to HKEY_LOCAL_MACHINESOFTWAREMicrosoftInternet ExplorerAdvancedOptions
- Click + to open HKEY_LOCAL_MACHINESOFTWAREMicrosoftInternet ExplorerAdvancedOptions
- Scroll down to HKEY_LOCAL_MACHINESOFTWAREMicrosoftInternet ExplorerAdvancedOptionsJAVA_VM
- Click + to open HKEY_LOCAL_MACHINESOFTWAREMicrosoftInternet ExplorerAdvancedOptionsJAVA_VM
- Highlight Java VM
- Press the <DELETE> key
Uninstall Java from Mac
In order to remove Java from your Mac computer, you should have Administrator permissions or privileges.
- Click on the Finder icon located in your dock.
- Click on Applications tab on the sidebar.
- In the Search box enter JavaAppletPlugin.plugin.
- This will find the JavaAppletPlugin.plugin file.
- Right click on JavaAppletPlugin.plugin and select Move to Trash.


????
thank u brother