An Overview on Backing up and Restoring Active Directory
To ensure availability of mission critical resources and network objects, and business continuity, you would need to perform back ups of Active Directory if it is running in your environment. This is because Active Directory normally hosts mission critical data, and resources. Backups are typically preformed for a number of reasons, including the following:
- Protect your network environment from the accidental deletion of, or modification of data, and from hardware failures: Having a readily accessible back up of Active Directory would ensure that you can recover any important Active Directory objects which were deleted in error. Backups also prove invaluable when unauthorized users intentionally delete or modify data. The backup would enable you to restore data to its previous state of integrity. Because certain hardware failures such as corrupted hard disk drives can cause considerable loss of data, backing up your data would ensure that the business can continue to perform its mission critical functions when such an event does occur.
- Store mission critical data: It is recommended to regularly back up mission critical data so that any previous version of information can be accessed, if necessary, at some time in the future.

Because Active Directory is dependant on the Registry, you need to back up files within the system directory. These files are called system files. System state data basically contains the main configuration information in Windows 2000, and Windows Server 2003. What actual information is included in system state data is determined by operating system (OS) configuration. System state typically includes the following important data, files and components:
- The Windows Registry
- The contents of the SYSVOL directory
- Files which are protected by the Windows File Protection system
- Boot and system files: Ntdetect.com, Ntldr and Bootsect.dat.
- The COM+ Class Registration database
- The Active Directory database (Ntds.dit), including all log files and checkpoint files
- Cluster service files
- Certificate service files
- The Internet Information Server (IIS) metabase
You can use one of the methods listed below to back up Active Directory.
- You can back up the system state data only
- You can back up Active Directory as part of a full system backup
- You can back up Active Directory as part of a partial system backup
The best option to use when specifying what data or components should be backed up in the Active Directory backup; is to specify a back up of system state data. This ensures that all core system files are backed up. When a full system backup is performed, system state data is automatically included in the back up process. When performing a partial backup, you can specify that system state data should be included. Manually specifying individual files and components for an Active Directory backup can be an extremely complicated process. Apart from having to be able to identify and specify all important system files and components, you also need to be able to specify which other important Active Directory data and components need to be backed up, such as the replication topology, and Group Policy information.
You can back up Active Directory by using the Windows Server 2003 Backup utility, or you from the command line, using the Ntdsutil command-line utility. The Windows Server 2003 Backup utility includes the feature of using volume shadow copying to back up open files. With the previous versions of Windows, a third party backup tool had to be used to back up open files. The Volume Shadow Copy service creates a read-only copy of any open files. This in turn ensures that these files can continue to be accessed.
In Windows 2000 Active Directory, you could only perform one of the following restore methods:
- Authoritative Restore
- Non- Authoritative
When it comes to restoring Windows Server 2003 Active Directory, you can use one of the following restore methods:
- Normal Restore: In Windows 2000, this was your Non-Authoritative restore method. A Normal restore functions pretty much the same as a Non-Authoritative restore. With a Normal restore, the Backup utility is run on the computer while in Directory Services Restore Mode. After the domain controller is rebooted, normal replication occurs with replication partners.
A normal restore is typically performed when the following conditions exist:
-
- A domain has multiple domain controllers, and only one domain controller is operational. You can use a Normal restore to restore all other domain controllers in the domain.
- A domain has a single domain controller, and that domain controller has to be restored. You can also choose to alternatively perform a Primary restore of Active Directory.
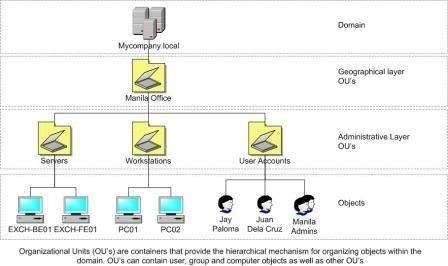
- Authoritative Restore: An Authoritative restore of Active Directory has to be performed in cases where a Normal restore would not be able to return Active Directory to the correct state. For instance, if an organizational unit was deleted in error, a Normal restore would only result in the particular OU being deleted once again, after replication. This is basically due to the replication partners having a higher version number for the particular OU. An Authoritative restore has a similar process to that of a Normal restore, the difference being that after system data is restored, you define certain Active Directory objects as being authoritative. When Active Directory objects are defined as authoritative, the particular objects have the higher version numbers. This results in these objects being replicated to the other domain controller’s copies of the Active Directory database.
- Primary Restore: The Primary restore method is used when each domain controller within a domain hosting multiple domain controllers, needs to be restored. What this means is that the entire domain has to be reconstructed from the Active Directory backup. This method can also be used to restore Active Directory for a domain that only has one domain controller. The Primary restore method is selected in Windows Server 2003 Backup utility by merely enabling the Primary restore method checkbox. This removes previous complexities associated with performing this type of restore in Windows 2000. The Primary restore process is also very similar to that performed for a Normal restore of Active Directory.
How to back up Active Directory using the Windows Server 2003 Backup Utility
- Click Start, All Programs, Accessories, System Tools, and then click Backup. You can also access the Windows Server 2003 Backup utility by clicking Start, Run, entering ntbackup in the Run dialog box, and then clicking OK.
- On the initial page of the Backup or Restore Wizard, click Next.
- Ensure that the default option, Back up files and settings, is selected on the Backup Or Restore page. Click Next.
- On the What to Back Up page, you can choose between the following options:
- All information on this computer
- Let me choose what to backup
- After selecting the appropriate option click Next.
- If the Let me choose what to backup option was previously selected; on the Items to Back Up page, choose the files, data or components that should be included in the backup of Active Directory. Click Next.
- On the following page, in the Choose a place to save your backup list box, enter the path that the backup should be saved to.
- Provide a name for backup file in the Type a name for this backup box and then click Next.
- Click Finish to immediately initiate the back up of Active Directory. This back up is executed using the default advanced options settings, and is usually opted for when performing a full system backup. If you want to configure advanced option settings, click Advanced, and not Finish.
- When the Type of Backup page appears, select the type of backup that should be performed. You can select one of the following options from the Select the type of backup list box.
- Normal: All specified files and components are backed up. The archive attribute is however reset.
- Copy: All specified files and components are backed up. The archive attribute is not reset.
- Incremental: This type of backup references the archive attribute, to isolate those files which have changed since the time when the last backup was performed, and then only backs up the changed files. The archive attribute is then cleared to enable the next backup process to determine only those files that have changed from this current backup, to the next. Only these files are then backed up in the following back up process.
- Differential: A differential backup also only backs up files which have changed since the previous backup. The difference between this backup type and the Incremental backup type, is that a Differential backup does not clear the archive attribute.
- Daily: The Daily backup type references the files’ timestamps, and then backs up files which have been created or changed on the particular day.
- Check the Backup Migrated Remote Storage Data checkbox if you want re-parse points to be included in the back up. Click Next.
- On the How To Backup Page, you can choose between the following options:
- Verify data after backup: Select this option if you are backing up mission critical data.
- Use hardware compression, if available: This option should be enabled if it is available. The option only becomes available when the Backup utility recognizes a storage media that supports hardware compression.
- Disable Volume Shadow Copy: This option is automatically enabled.
- Click Next.
- On the Backup Options page, you can select one of the following options:
- Append this backup to the existing backups: The backup will be appended to an existing backup.
- Replace the existing backups: The backup will overwrite an existing backup.
- Click Next.
- On the When to Back Up page, you can select one of the following options:
- Now: This results in the backup commencing immediately.
- Later: This option enables you to specify when the backup should be performed.
- If you selected the Later option, enter a name for the backup in the Job name box. You will notice that the settings in the Start date box reflect the current date and time. To change this, click Set Schedule.
- When the Schedule Job dialog box opens, in the Schedule Task list box of the Schedule tab, choose one of the following options to set when the backup should be performed:
- Daily, Weekly, Monthly, Once, At System Startup, At Logon, and When Idle
You can click the Advanced button to define start and end dates, and to configure how frequently the back up should be performed.
- Click the Settings tab of the Schedule Job dialog box. You can configure the scheduling options listed below, from this tab.
- Delete the task if it is not scheduled to run again; the particular task will be removed from the scheduled tasks items if i is not set to run again.
- Stop the task if it runs for; you can set the time (hours/minutes/) permitted for this backup to execute. The default setting is 72 hours.
- Only start the task if the computer has been idle for; you can set how much computer idle time should elapse, before the backup can be started.
- If the computer has not been idle that long, retry for up to; this setting is associated with the previous option. You can set how often the computer should continually be checked to determine whether the sufficient quantity of idle time has elapsed.
- Stop the task if the computer ceases to be idle; when enabled, the backup job stops if a user accesses the computer.
- Don’t start the task if the computer is running on batteries; if selected, the backup job does not start when the computer is running on batteries
- Stop the task if battery mode begins; if selected, the backup job stops when the computer switches to battery mode.
- Wake the computer to run this task; if selected, the computer is woken from a power saving mode in order for the backup to commence.
- Click OK in the Schedule Job dialog box. Click Next.
- When the Set Account Information dialog opens, in the Run As box, enter the details of an account that has sufficient rights to perform the backup operation. Enter the password for this account in the Password and Confirm Password boxes.
- Click OK. Click Next.
- The wizard next displays summary information on the settings which you have specified for the backup. Review this information
- Click Finish.
How to back up Active Directory using the command line
You can perform a backup of Active Directory from the command line by using the Ntbackup command-line utility. This option is available as an alternative to using the Backup utility.
To use the Ntbackup command-line utility to perform a back up,
- Click Start, Run, and enter cmd in the Run dialog box. Click OK.
- You can use the following command and options to back up system state data:
-
ntbackup backup systemstate /J ‘Backup Job' /F ‘C:backupfile.bkf'ntbackup, indicates the Ntbackup command-line backup utilitybackup, specifies that a backup should be performedsystemstate, specifies that system date data should be backed upJ, defines the name of the backup jobF, defines the name of the backup file
How to perform a Normal Restore of Active Directory
- Reboot the computer
- During startup, press F8 when prompted to, and then select Directory Services Restore Mode (Windows DCs only) from the Windows Advanced Options menu. Press Enter.
- Choose the operating system that should be started. Press Enter.
- When the Safe Mode logon prompt appears, enter the appropriate local administrator account information, and then click OK.
- Click OK when a message appears, advising that Windows is running in Safe Mode.
- Click Start, All Programs, Accessories, System Tools, and then click Backup.
- On the initial page of the Backup or Restore Wizard, click Next.
- Ensure that the Restore files and settings option is selected on the Backup Or Restore page. Click Next.
- On the What to Restore page, choose the backup which you want to use for the restore process. Click Next.
- Click Finish to immediately start a normal restore of Active Directory. If you want to configure advanced option settings, click Advanced, and not the Finish button.
- When the Where to Restore page appears, choose one of the following optios from the Restore files to list box:
- Original location, this default setting restores files to their original locations.
- Alternate location, if selected, you can specify a different location to which the files should be restored.
- Single folder; this option restores files to a single directory.
- Click Next.
- Click OK if a message is displayed, warning you that a restore of system state data overwrites existing system state data.
- When the How to Restore page opens, choose between the following options:
- Leave existing files (Recommended); select this option if you do not want the restore to overwrite any existing files.
- Replace existing files if they are older than the backup files; if selected, files older than the backup files are replaced.
- Replace existing files; this option replaces all existing files with the backup files.
- Click Next.
- When the Advanced Restore Options page is displayed, you can select the following options:
- Restore security settings; is enabled by default. If you disable this checkbox, all files would be restored without any permissions.
- Restore junction points, but not the folders and file data they reference; when selected, the restore process is able to restore information on mounted drives.
- Preserve existing volume mount points; when selected, existing mounts are protected on the volume.
- Restore the Cluster Registry to the quorum disk and all other nodes; if applicable for this domain controller, the cluster quorum database is restored.
- When restoring replicated data sets, mark the restored data as the primary data for all replicas; this option should be enabled if you are performing a Primary restore of Active Directory.
- Click Next.
- Click Finish to start the Normal Restore of Active Directory.
How to perform an Authoritative Restore of Active Directory
- Perform a Normal Restore of Active Directory.
- When prompted to restart the server, click No and then close the Windows Backup Utility.
- Click Start, Run, and enter cmd in the Run dialog box. Click OK.
- To open the Ntdsutil command-line utility, enter ntdsutil.
- Enter
authoritative restore. - To specify Active Directory, or components of Active Directory as authoritative, use one of the following methods:
Enter restore database; this sets the domain and all configuration containers as authoritative.Enter restore subtree, together with the distinguished name of the Active Directory object you want to mark as authoritative.- You can use the verinc option with either of the above commands, to explicitly set the version number. The option is useful when a different Authoritative restore needs to be performed on an existing Authoritative restore.
- When the Authoritative Restore Confirmation dialog box appears, asking whether the Authoritative restore should be performed, click Yes.
- Enter
quit, and enterquitagain to close the Ntdsutil command-line utility. - Proceed to
rebootthe server.
How to perform a Primary Restore of Active Directory
- Reboot the domain controller.
- During startup, press F8 when prompted, and then select Directory Services Restore Mode (Windows DCs only) from the Windows Advanced Options menu. Press Enter.
- Choose the operating system that should be started. Press Enter.
- When the Safe Mode logon prompt appears, enter the appropriate local administrator account information, and then click OK.
Click OK when a message appears, advising that Windows is running in Safe Mode. - Click Start, All Programs, Accessories, System Tools, and then click Backup.
- On the initial page of the Backup or Restore Wizard, click Next.
- Ensure that the Restore files and settings option is selected on the Backup Or Restore page. Click Next.
- On the What to Restore page, choose the backup which you want to use for the Primary restore process. Click Next.
- Click Advanced.
- On the Where to Restore page, leave the default setting of Original location, unchanged, and then click Next
- On the How to Restore page, choose the Replace existing files option. Click Next.
- When the Advanced Restore Options page appears, enable the When restoring replicated data sets, mark the restored data as the primary data for all replicas checkbox. You can leave all other default settings on the Advanced Restore Options page unchanged.
- Click Next.
- Click Finish to start the Primary restore of Active Directory.
- Reboot the server.


Follow Us!