Uninstalling a program in any version of Windows is a fairly simple process. There are differences between versions, and here you can find a step by step guide for each specific Windows version:
How to Uninstall a Program in Windows 8
1) Hover the mouse over the top right corner. In the menu which pops up click on the Search.
2) Type in “Control Panel” and press “Enter” on the keyboard.
3) Select the “Uninstall a Program”.
4) When the Uninstall a Program window opens, select the program you want to remove and then click its Uninstall, Change, or Repair button.
5) When Windows asks whether you are sure, click “Yes” button.
You can also uninstall a program as mentioned in the video bellow:
How to Uninstall a Program in Windows 7 and Windows Vista
1) Select the Start Button/Windows button on the taskbar (commonly located on the lower left corner of the screen). The start menu will appear and show a variety of options.
2) Select the “Control Panel” option, which will open up either:
- A drop down list with the control panel contents or
- The control panel window
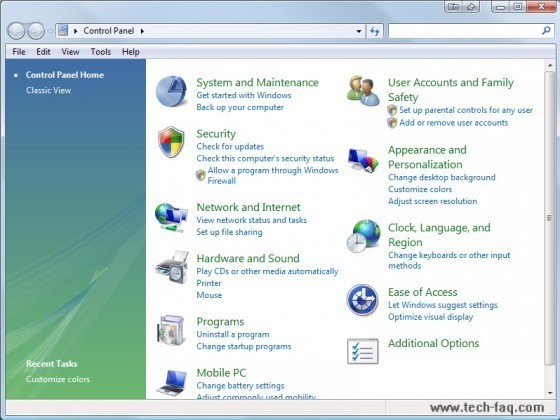
3) If the drop down list appears, find the “Programs and Features” option on the list. If the Control Panel window shows, the Control Panel Home screen will be displayed:
4) From this screen, select the “Uninstall a program” option under “Programs.”
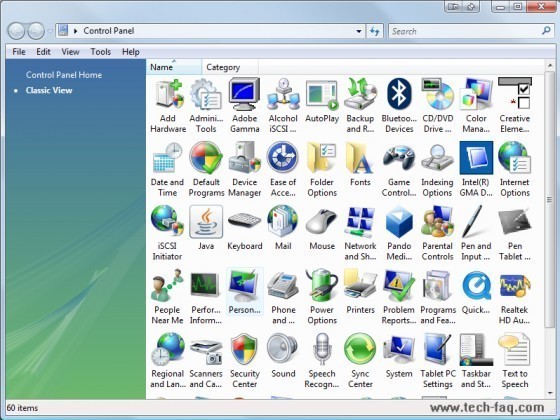
Instead of the Control Panel Home screen, the Classic View Control Panel may be displayed:
5) On this screen, locate the “Programs and Features” icon and select it to open the Programs and Features options. Alternately, hold down the “Windows” key then press the “R” key to open up a run program dialog. Once this dialog appears, type “appwiz.cpl” into the text field then continue by pressing the “ok” button or hitting the “Enter” key. This should open the application wizard (“Programs and Features”).
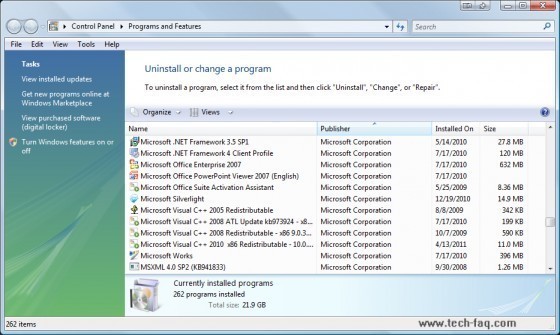
This is an example of the Programs and Features window:
6) The list of installed programs is available for examination and uninstalling. Find the program in this list to be removed and click it to see the available options for the program.
Once an item from the list is clicked, the following icons will show up on tab options:
Note: Instead of “Uninstall,” a button with “Uninstall/Change” may be displayed or the “Repair” option may be missing if there is no available option for repair.
7) Select the “Uninstall” Option and the program’s uninstall process should open up. Depending on the options for removing the specific program, the program may require the user to authorize or select what should be removed.
Note: Some programs have a completely automated uninstall service once the user chooses to uninstall a particular program, which will simply remove all of the files associated with the program.
How to Uninstall a Program in Windows XP
1. Click “Start”.
2. Click “Control Panel”.
3. Double click “Add Remove Programs” icon.
4. Select the program that you want to remove from the list, and then click “Remove”.
5. Follow the specific program instruction until you confirm and finish its uninstallation.
Using the Uninstall File Included with the Program
Many programs that are installed on a system have their own uninstall program file inside their installation directory. To attempt to access the uninstall file directly from the program, do the following:
Note: Some programs will not have an uninstall program file available with this option or will instruct the user to use the Windows “Programs and Features/Application Wizard” to uninstall the program.
1) Navigate to the Program Files folder.
2) Open up the start menu through the taskbar, find the “Computer” tab on the list, and select it to open the list of available drives on the system.
3) Choose the “Windows Main Disc (C:)” option (which may have a different name or drive letter depending on the system’s setup). This will open the disk as a folder containing all of the main disk files.
4) Among the folders, locate and open the “Program Files” folder. The Program Files folder contains all the installed programs on the computer (provided that the Program Files directory was chosen as the installation directory during the installation process).
5) Either find the folder that belongs to the program to be deleted or the publisher that released the software to find the files to uninstall the program.
6) Once the appropriate folder for the program to be removed is found, locate the program’s uninstall file to start the uninstall process. The uninstall file may have one of a large variety of names such as:
- Uninstall.exe
- Uninst.exe
- Unins000.exe
- Unwise.exe
- Unwise32.exe
The uninstall file may also have an unrecognizable filename to help prevent users from accidentally choosing it when trying to access the program itself.
7) If unable to uninstall the program this way, use the Windows Programs and Features service.
Note: Do not delete folders in the Program Files directory without using the uninstall file or the Programs and Features service. Doing this only removes the files and does not go through the appropriate steps to completely remove the program from the system. Registry entries, file associations, and other system files may be tied in with the program that is not properly removed unless an intended removal process is used.
Uninstalling Spyware or Malware Programs
Unfortunately, spyware or malware software may infect a computer even if measures are taken against them. These types of programs tend to disguise themselves as useful programs, but in reality they log information from the computer, serve ads during Internet use, and generally cause computer problems. Uninstalling these programs is not as easy as the previous two methods mentioned in this article. Removing these programs requires third party removal software to safely and completely remove them from the system.
There are a few options to try:
Malwarebytes Antimalware (Available at Malwarebytes)
Adaware (Available at Lavasoft)
Once an option for spyware and malware removal is in place, allow the program to scan the computer for malware, spyware, and adware. Once completed, the computer will have less unwanted programs, which will not only free up hard disk space, but more than likely increase the CPU’s available RAM and processing power, resulting in a faster running computer. Be sure to update the anti-virus program being used.

Follow Us!