DNS Server and DNS Server Roles Overview
Before DNS, HOSTS files were used to resolve host names to IP addresses. The HOSTS files were manually maintained by administrators. The HOSTS file was located on a centrally administered server on the Internet. Because of the shortcomings of the HOSTS files, DNS was designed and introduced. From the days of Windows NT Server 4.0, DNS has been included with the operating system. DNS is a hierarchically distributed and scalable database. DNS provides name registration, name resolution and service location for Windows 2000 and Windows Server 2003 clients.
A DNS zone is the contiguous portion of the DNS domain name space over which a DNS server has authority, or is authoritative. A zone is a portion of a namespace – it is not a domain. A domain is a branch of the DNS namespace. A DNS zone can contain one or more contiguous domains. A DNS server can be authoritative for multiple DNS zones.
A DNS server is a computer running the DNS Server service, or BIND; that provides domain name services. The DNS server manages the DNS database that is located on it. The DNS server program, whether it is the DNS Server service or BIND; manages and maintains the DNS database located on the DNS server. The information in the DNS database of a DNS server pertains to a portion of the DNS domain tree structure or namespace. This information is used to provide responses to client requests for name resolution. When a DNS server is queried for name resolution, it can respond to the request directly by providing the requested information, provide a pointer (referral) to another DNS server that can assist in resolving the query, or respond that the information is unavailable or that is does not exist. A DNS server is authoritative for the contiguous portion of the DNS namespace over which it resides.
You can configure different server roles for your DNS servers. The server role that you configure for a name server affects the following operations of the server:
-
The way in which the DNS server stores DNS data
-
The way in which the DNS server maintains data
-
Whether the DNS data in the database file can be directly edited.
In DNS, a standard primary DNS server is the authoritative DNS server for a DNS zone. There are a number of zones used in Windows Server 2003 DNS:
-
Primary zone: This is only zone type that can be directly updated or edited because the data in the zone is the original source of the data for all domains in the zone. Updates made to the primary zone are made by the DNS server that is authoritative for the specific primary zone.
-
Secondary zone: This is a read-only copy of the zone that was copied from the master server during zone transfer
-
Active Directory-integrated zone: This is an authoritative primary zone that stores its data in Active Directory. Active Directory-integrated zones can be regarded as enhanced standard primary zones.
-
Stub zone: Stub zones only contain those resource records necessary to identify the authoritative DNS servers for the master zone
Standard secondary DNS servers are usually implemented to provide a number of features for the DNS environment, including:
-
Provide redundancy: It is recommended to install one primary DNS server, and one secondary DNS server for each DNS zone (minimum requirement). Install the DNS servers on different subnets so that if one DNS server fails, the other DNS server can continue to resolve queries.
-
Distribution of DNS processing load: Implementing secondary DNS servers assist in reducing the load on the primary DNS server.
-
Provide fast access for clients in remote locations: Secondary DNS servers can also assist in preventing clients from transversing slow links for name resolution requests.
In addition to two server roles just mentioned, you can als configure the DNS server as a DNS forwarder, or as a caching-only DNS server. The remainder of this Article focuses on the different DNS server roles that you can configure for your DNS servers.
Understanding Standard Primary DNS Servers
A standard primary DNS server is a name server that obtains zone data from the local DNS database. This makes the primary DNS server authoritative for the zone data that it contains. When a change needs to be made to the resource records of the zone, it has to be done on the primary DNS server so that is can be included in the local zone database.
A DNS primary server is created when a new primary zone is added. The primary server that is created becomes the mechanism for updating the specific primary zone.
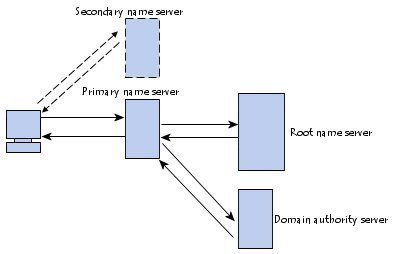
When a query is sent to the standard primary DNS server for name resolution, the following events take place:
-
The request for name resolution is sent to the primary DNS server.
-
The primary DNS server compares the requested name to the information it contains in its local zone database.
-
If the primary DNS server locates a match for the queried name, the requested information is returned to the client.
-
If the DNS server cannot find a matching record in its local zone database file, the DNS server then attempts a number of name resolution methods to resolve the request on behalf of the client.
-
If all attempts for name resolution in unsuccessful, the DNS server returns an error message to the client.
Understanding Standard Secondary DNS Servers
This DNS server type obtains a read-only copy of zone information through DNS zone transfers. A secondary DNS server cannot make any changes to the information contained in its read-only zone copy. A secondary DNS server can however resolve queries for name resolution.
Secondary DNS servers are usually implemented to provide fault tolerance, provide fast access for clients in remote locations, and to distribute the DNS server processing load evenly. If a secondary DNS server is implemented, that DNS server can continue to handle queries when the primary DNS becomes unavailable. Secondary DNS servers also assist in reducing the processing load of the primary DNS server. It is recommended to install at least one primary DNS server, and one secondary DNS server for each DNS zone.
A secondary DNS server obtains its data from the primary DNS server's zone database, as a copy of that database. During zone transfer, the primary DNS server's zone database is replicated to the secondary DNS server. A secondary DNS server cannot make changes to its zone information. All changes have to be made on the primary zone, and then have to be replicated to the secondary DNS server through DNS zone transfer.
DNS Notify is a mechanism that enables a primary DNS server to inform secondary DNS servers when its database has been updated. The mechanism informs the secondary DNS servers when they need to initiate a zone transfer so that the updates of the primary DNS server can be replicated to them. When a secondary DNS server receives the notification from the primary DNS server, it can start an incremental zone transfer or a full zone transfer to pull zone changes from the primary DNS server.
Understanding Caching-Only DNS Servers
The main characteristics of caching-only DNS servers are:
-
Caching-only DNS servers do not host zones.
-
They are not authoritative for any DNS domain.
-
The information stored by caching-only DNS servers is the name resolution data that it has collected through name resolution queries.
A caching-only DNS server just performs queries and then stores the results of these queries. All information stored on the caching-only DNS server is therefore only that data which has been cached while the server performed queries. Caching-only DNS servers only cache information when the queries have been resolved.
when a caching-only DNS servers starts or the first time, it has no cached information. The caching-only DNS server collects information as it sends and resolves queries. One of the main advantages of implementing caching-only DNS servers is that they are excluded from the zone transfer process, and therefore do not generate network traffic from zone transfers.
Understanding Master DNS Servers
The servers from which secondary DNS servers obtain zone information in the DNS hierarchy are called master servers. When a secondary DNS server is configured, you have to specify the master server from whom it will obtain zone information. Zone transfer enables a secondary DNS server to obtain zone information from its configured primary DNS server, and enables these servers to continue handling queries if the primary DNS server fails. In this case, the primary DNS server is the master server of the secondary DNS server. A secondary DNS server can also transfer its zone data to other secondary DNS servers, who are beneath it in the DNS hierarchy. In this case, the secondary DNS server is regarded as the master server to the other subordinate secondary DNS servers. A secondary DNS server initiates the zone transfer process from its particular master server when it is brought online.
Understanding Dynamic DNS Servers
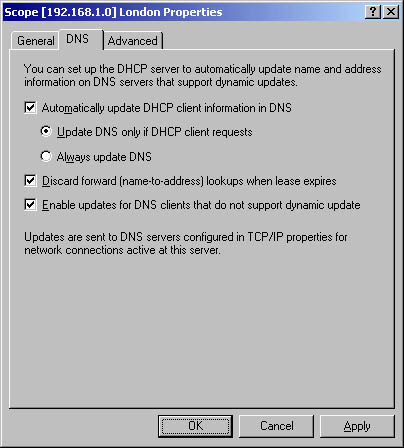
Windows 2000, Windows XP and Windows Server 2003 computers can dynamically update the resource records of a DNS server when a client's IP addressing information is added, or renewed via Dynamic Host Configuration Protocol (DHCP). Both DHCP and Dynamic DNS (DDNS) updates make this possible. When dynamic DNS updates are enabled, a client sends a message to the DNS server when changes are made to its IP addressing data. This indicates to the DNS server that the A type resource record of the client needs to be updated.
How to implement a caching-only DNS server
-
Open Control Panel
-
Double-click Add/Remove Programs., and then click Add/Remove Windows Components.
-
The Windows Components Wizard starts.
-
Click Networking Services, and then click Details.
-
In the Networking Services dialog box, select the checkbox for Domain Name System (DNS) in the list.
-
Click OK. Click Next.
-
Click Finish.
-
Do not add or configure any zones for the DNS server. The DNS Server service functions as a caching-only DNS server by default. This basically means no configuration is necessary to set up a caching-only DNS server.
-
You should verify that the server root hints are configured correctly.
How to add a new zone to a DNS server
-
Click Start, Administrative Tools, and then click DNS to open the DNS console.
-
In the console tree, find and select the DNS server that you want to create a new DNS zone.
-
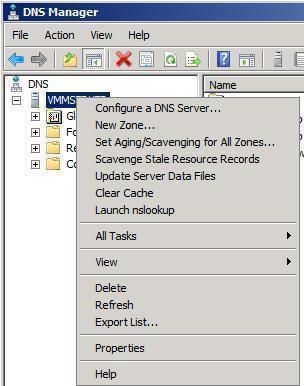
From the Action menu, click the New Zone option.
-
On the initial page of the New Zone Wizard, click Next.
-
Select the zone type that you want to create. The options are:
-
Primary, to create a new standard primary zone.
-
Secondary, to create a copy of the primary zone.
-
Stub, to create a copy of zone but for only the NS record, SOA record, and the glue A record.
-
-
Select the default selected option – Primary zone.
-
To integrate the new zone with Active Directory, and if the DNS server is a domain controller; then you can select the Store the zone in Active Directory (available only if DNS server is a domain controller) checkbox.
-
Click Next.
-
On the Active Directory Zone Replication Scope page, accept the default setting for DNS replication: To all domain controllers in the Active Directory domain. Click Next.
-
Select the Forward lookup zone option on the following page which is displayed by the New Zone Wizard, and then click Next.
-
Enter a zone name for the new zone. Click Next.
The options that you can select on the following page with regar to dynamic updates are:-
Allow only secure dynamic updates (recommended for Active Directory) option: This option is only available if you are using Active Directory-integrated zones.
-
Allow both non-secure and secure dynamic updates option: Select this option with caution!
-
Do not allow dynamic updates option: You have to manually update zone information and resource records.
-
-
Choose the best option for your circumstance, and then click Next.
-
Click Finish to add the new zone to your DNS server.
How to enable dynamic updating on your DNS servers
Active Directory- integrated zones are set up to only allow secure dynamic updates.
-
Click Start, Administrative Tools, and then click DNS to open the DNS console.
-
In the console tree, expand the DNS server node that contains the authoritative zone that you want to work with.
-
Expand the Forward Lookup Zones folder.
-
Locate the specific zone that you want to configure.
-
Right-click the zone, and then select Properties on the shortcut menu.
-
When the Zone's Properties dialog box opens, leave the General tab displayed.
-
The options available in the Dynamic updates: list box are:
-
None
-
Non-secure and secure
-
Secure only
-
-
Select the Secure only option, and then click OK.
How to disable dynamic updates for a host computer or interface
You can also disable dynamic updates for a host computer, for a specific interface on that computer, or for multiple interfaces on the computer.
-
Open the Registry Editor tool.
-
In the left pane, expand the HKEY_LOCAL_MACHINE key, expand System, expand CurrentControlSet, and then expand Services.
-
Locate Tcpip, and then expand this node as well.
-
Find the Parameters node.
-
To disable dynamic updates for the host computer, click the Parameters node. In the details pane, double-click the DisableDynamicUpdate entry. Change the value data of DisableDynamicUpdate to 1 to disable dynamic updates. Click OK.
-
To disable dynamic updates for a single interface, expand the Parameters node, and then expand the Interface node. Select the interface, and then double-click the DisableDynamicUpdate entry in the details pane. Change the value data of DisableDynamicUpdate to 1 to disable dynamic updates. Click OK.
How to test a query on a DNS server
-
Click Start, Administrative Tools, and then click DNS to open the DNS console.
-
In the console tree, right-click the DNS server that you want to test and then select Properties on the shortcut menu.
-
When the DNS Server's Properties dialog box opens, click the Monitoring tab.
-
You can choose to perform a simple query test, a recursive query test, or you can specify that the DNS server automatically performs testing at an interval that you set.
-
In the Select A Test Type area of the Monitoring tab, select the A Simple Query Against This DNS Server checkbox.
-
Click the Test Now button.
-
The Test Results area of the tab displays the results of the test.
-
Click OK.


.sS.!
When I saw a DNS server make queries where he can’t find the server what the hosts want… Can I make a fake server with that hostname ??
Or.. When I attach a host to the network then I will recive an IP address with the rules of my subnetwork and I will be not able to fake that server because I will have a different IP.
Have to I attach my server on the DNS subnetwork?