Mac OS X Version 10.3 and Higher
- Log into the machine.
- Navigate to the Apple menu and select System Preferences.
- This action will launch a System Preferences window.
- In the System Preferences window, locate the section entitled System.
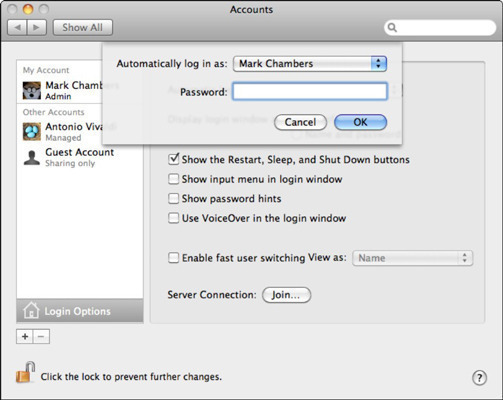
- In the System section, locate and click the Accounts icon. (It should be the first icon from the left.) This will launch an Accounts window.
- In the Accounts window’s left pane, locate the Login Options.
- If grayed out or dimmed, this task requires authentication.
- To authenticate, click the golden padlock icon at the Accounts window’s bottom left. This will launch a screen entitled Authenticate.
- Enter the Administrator Password and click OK. If the correct password is entered, this will authenticate the user and close the window. Once the window closes, Login Options will no longer be dimmed.
- If grayed out or dimmed, this task requires authentication.
- Select Login Options. This will display one’s login options in the Accounts window’s right pane.

- Deselect/Uncheck the first option – Automatically log in as username.
- Close the Accounts window.
- Navigate to the Apple menu and select System Preferences. This will re-launch the System Preferences window.
- Relocate and click the Accounts icon.
- Locate and select Login Options (re-authenticate if necessary).
- Select/Check the first option – Automatically log in as username.
- From the pull-down menu select one’s username.
- A window will appear and prompt the user for the password assigned to selected username. Enter the correct password. Please note, if completing this step following an admin password reset, please enter one’s new admin password.
- Click OK to commit the password information and close the window.
- Close the Accounts window and reboot to verify the automatic login capability.
Mac OS X Versions Prior to 10.3
- Log into the machine.
- Navigate to the Apple menu and select System Preferences. This action will launch a System Preferences window.
- Locate the View menu in the primary menu bar at the top of the screen.
- Click View and from the resulting menu, select Accounts. This will launch an Accounts window.
- Deselect/Uncheck the “Automatically log in as username” option.
- Close the System Preferences window.
- Navigate to the Apple menu and select System Preferences. This will re-launch the System Preferences window.
- In the top menu bar, navigate once again to View –> Accounts.
- Select/Check the “Automatically log in as username” option.
- Click Set Auto Login. This will prompt for a password.
- A window will appear and prompt for the password assigned to selected username. Enter the correct password. Please note, if completing this step following an admin password reset, please enter the new admin password.
- Click OK to commit the password information and close the window.
- Close the Accounts window and reboot to verify the automatic login capability.


bil
very good details but when I unlock login options the disable pane remains greyed out. How do I know if key chain is the problem? or other methods of un-cheching. tks, bill