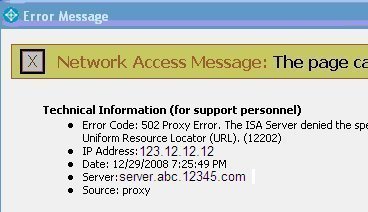
While surfing the Internet, if an end-user encounters a 502 proxy error, he or she will not be able to view the desired web page. The error message is commonly encountered when accessing websites through a proxy server. The problem is typically caused for one of two reasons: 1 – The Internet Security and Acceleration (ISA) is configured to throw a proxy error to help guard against external or internally-based Internet threats, and 2- The client or server computers are misconfigured or using outdated software.
What is a 502 Proxy Error?
A 502 proxy error is typically thrown in the HTTP cycle. When the error occurs, a server (does not have to be a Web server) is filling a role similar to a proxy or a gateway server. When a client computer sends an HTTP request (typically a web browser, but can be any software application that is capable of making an HTTP request), it will pass through the server in order to obtain access to the desired URL. The proxy or gateway subsequently receives a 502 error, or invalid response, from the server located “upstream” in the attempt to fulfill the client request. The majority of the time the error is thrown, the upstream server is functioning appropriately. The proxy or gateway and upstream servers just cannot agree on the appropriate protocol for exchanging the information requested in the original client HTTP request. In many of these cases, either the proxy or upstream server are not configured correctly or are running incompatible software.
Why Does a 502 Proxy Error Get Thrown?
During a typical web browsing session, the following is an example of the classic HTTP cycle when a client computer and web server are communicating:
Client Computer: The IP address of the desired website will be obtained from the URL of the site from the DNS server.
Client Computer: The computer obtains an IP socket connection to the desired IP address and then sends an HTTP data stream through the IP address.
Web Server: HTTP data is sent back to the client computer in response to the original HTTP request. The HTTP response will include status codes and other useful information for the client computer.
Client Computer: If there is an error in the client’s request or server’s ability to respond, there will be an HTTP error code of 502 included in the server’s response (502 Proxy Error).
How to Fix 502 Proxy Errors (Client Side)
One of the most frustrating things for the average computer user is determining where the problem resides when receiving the 502 Proxy Error. Before engaging the webmaster of the site or one’s Internet Service Provider (ISP), it is prudent to troubleshoot the client computer to make sure that it is not the reason that the error is being thrown.
Step 1 – Close the Internet browser that you are using. If you have an alternate browser on your computer, launch that application and attempt to access the site that is throwing the 502 error. If you do not have an alternative web browser installed on your computer, restart the one you were using. A number of times, web browsers can end up having scripting errors on previous web sites impact being able to view new web pages. Some of the popular alternative web browsers to Internet Explorer include Mozilla Firefox and Google Chrome.
Step 2 – Clear the web browser’s cache to ensure that the error is not being thrown due to a legacy issue with the problem webpage or other website that you have visited recently.
Step 3 – Restart the computer if restarting the Internet browser did not work. Although more commonly encountered on computers running the Windows operating system, restarting the computer can help fix errors the computer is encountered with the local network or ISP. Once the computer has completed the restart process, launch an Internet browser and attempt to load the problem web page.
Step 4 – If still unsuccessful with clearing the 502 Proxy Error, restart the DSL or cable modem that supplies the Internet connection for your home or place of business. This may take a few minutes while the modem conducts the restart process, so do not attempt to access the problem webpage until the modem is back online.
Step 5 – Try to surf to additional websites. If the 502 error is being shown across a number (or all) of the websites that you desire to view, then the issue may reside with the ISP or local network. If this is the case, contact the ISP via phone or chat via smart phone and ask if there is an outage in the local area or specifically with the residence’s Internet service. Once corrected, attempt to access the problem websites.
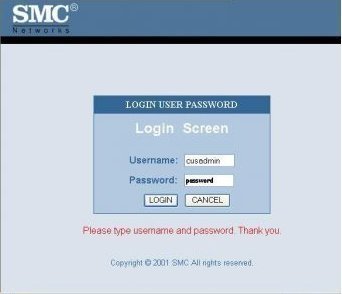
Step 6 – If there is not service outage to the residence, contact the customer service department of the ISP or the admin on a local network to request a service repair person to verify the modem and wireless router (if installed) in your residence.
How to Clear Cache (Internet Explorer 9/10)
Internet Explorer 9 and Internet Explorer 10 are the two most recent releases of the popular web browser produced by the Microsoft Corporation in 2011 and 2012 respectfully. The following are the steps to take in order to clear cache, browsing history, and cookies in the browsers:
Step 1 – Open the Internet Explorer application.
Step 2 – Choose the “Tools,” “Safety,” and “Delete Browsing history” men options.
Step 3 – Ensure you uncheck the “Preserve Favorites website data” check box.
Step 4 – Check the “Temporary Internet Files” and “Cookies” check boxes followed by clicking the “Delete” menu button.
Step 5 – Acknowledge the confirmation window that appears at the bottom of the web browser to complete clearing the browser’s cache and cookies.
Step 6 – If the 502 proxy error is still thrown by the browser, it may be necessary to use advanced options to more fully clear the cache. If this is the case, exit from Internet Options if the window is still open on the browser.
Step 7 – Select the “Tools” and “Developer Tools” menu choices.
Step 8 – Choose the “Cache” menu option and then pick the “Clear Browser Cache” menu choice.
Step 9 – Select the “Yes” menu button to finish clearing the browser cache.
How to Clear Cache (Internet Explorer 7)
Internet Explorer 7 was first released by the Microsoft Corporation in October 2006. It was the first major upgrade to the browser in more than five years by Microsoft and was shipped as the default browser for Windows Vista and Windows Server 2008.
Step 1 – Open Internet Explorer 7 by double clicking the program icon on your computer’s desktop.
Step 2 – Select the “Tools” and “Internet Options” menu options.
Step 3 – Select the “General” menu tab.
Step 4 – Choose the “Delete” menu button followed by clicking the “Delete Files” menu choice.
Step 5 – Select the “Yes” button followed by choosing the “Delete Cookies” menu choice.
Step 6 – Click the “Yes” menu button and the cache will be cleared from IE7.
How to Clear Browser Cache (Mozilla Firefox)
Mozilla Firefox is an open sourced, free Internet Browser that is designed to work on the OS X, Linux, Android, and Windows operating systems. The browser implements both current and emerging web standards and has more than 20% of the world-wide market share of web browsers. Similar to Internet Explorer users, those who use the browser may have the need arise to clear the Firefox cache in order to help troubleshoot the 502 proxy error issue.
Step 1 – Open the Mozilla Firefox web browser.
Step 2 – At the top of the browser window, select or click on the Firefox button.
Step 3 – Choose the “Firefox” button and then select the “Options” menu choice.
Step 4 – Pick the “Advanced” panel and then click the “Network” menu tab.
Step 5 – Choose the “Clear Now” menu button under the “Cached Web Content” section of the menu.
Step 6 – Click the “Ok” menu button to close the “Options” window of Firefox.
Step 7 – You can also setup Firefox to automatically clear cache when it closes. Before exiting from the “Options” window, select the “Privacy” panel. Then, under the “History” Sections select the “custom settings” menu choice and select the check box located next to the “Clear history when Firefox closes” menu option. Click “Ok” to close the window and Firefox will now be setup to clear cache when exiting the browser.
How to Clear Browser Cache (Google Chrome)
Google Chrome is released as a freeware browser by Google and was first seen on the market in early September of 2008. Since that time, it has gained a market share of 39% of all world-wide browser use. There is some debate behind these claims; however, with many still placing Chrome third in use behind Internet Explorer and Mozilla Firefox. Similar to the other major browsers, Chrome includes the ability for the end user to clear cache and other web browsing information from the program.
Step 1 – Double click the Chrome program icon located on your computer’s desktop to launch the application.
Step 2 – Select the “Chrome” menu button located on the web browser’s toolbar.
Step 3 – Select the “Tools” menu button.
Step 4 – Click the “Clear browsing data” menu option.
Step 5 – Exit from the Google Chrome Tools menu and the cache will now be cleared.
How to Clear Browser Cache (Android OS)
The Android OS is based on Linux and is primarily designed to support touchscreen mobile devices. The OS was released in 2007 and the first phone designed to run on the OS was released in 2008. The source code for the OS was released as open source under the Apache license by Microsoft, and supports the ability for end users to clear the browser cache to help troubleshoot the 502 proxy error.
Step 1 – Open or launch a browser window on the Android device by tapping the applications menu and selecting the appropriate program icon.
Step 2 – Select the menu key on the phone. It is normally located in the lower, left-hand corner of the keypad on the phone.
Step 3 – Select the “More” menu option from the listing the is subsequently displayed on the phone.
Step 4 – Select the “Settings” menu option to display the web browser settings options in the Android OS.
Step 5 – Select the “Privacy Settings” menu choice.
Step 6 – Select the “Clear Cache” and if desired, “Clear History” menu options.
Step 7 – Select the “Ok” menu button to complete clearing the cache on the Android device.
Step 8 – Attempt to visit the website that has been throwing the 502 proxy error to see if clearing the browser cache has fixed the problem.
How to Fix the 502 Proxy Error (Server Side)
If you are running IIS Server, a 502 proxy error can be generated through misconfiguration or failing to update the server. Some known cases which can result in the error being thrown include: Enabling the HTTPS inspection feature in the Microsoft Forefront Threat Management Gateway (TMG), trying to use a HTTPS URL to access a website which much have a client certificate through the Forefront TMG, and adding the site to the IIS Destination Exception list for HTTPS inspection. When this occurs, the error thrown will be similar to, “502 Proxy Error, An unknown error occurred while processing the certificate.” This specific instance of the 502 error comes from the Forefront TMG 2010 sending an empty client certificate to the web server while conducting the initial SSL handshake. IIS can throw this error when acting as either w web or gateway server.
Step 1 – Upgrade IIS to the latest version of the software available from Microsoft if the 502 error being thrown is persistent.
Step 2 – Install the Forefront Threat Management Gateway 2010 Service Pack 1 (or applicable update) if not installed during the IIS upgrade.
Step 3 – Open the “HTTPS Outbound Inspection” dialog box.
Step 4 – Choose the “No Validation option” for the web server.
Step 5 – Open Windows Notepad, and copy the script provided by Microsoft into the program.
Step 6 – Save the file to the computer with the file name, EnableHotfix982550.vbs.
Step 7 – Double click the new VBS file to complete fixing the IIS server.


Bob
Thank you but we are all not computer experts like you, you gave no details to us the computer semi illiterate as to how to do this exactly???
My yahoo mail is dead but all other sites work normal I just want to get my emails and contacts to send to my gmail account, the NEW YAHOO SUCKS!!
WillSpencer
It most likely isn’t fixable by you, only by Yahoo.