The majority of non-computer professionals think of a DMZ as the strip of land that serves as the buffer between North and South Korea along the 39th parallel north created as part of the Korean Armistice Agreement in 1953. In the computer security field; however, the DMZ (Demilitarized Zone) is either a logical or physical sub-network that contains most of a network’s externally connected services which connect to the Internet. The primary purpose of the DMZ is to provide another layer of security for a local area network (LAN). If a rogue actor is able to obtain access to services located in the DMZ, they are not able to gain full access to the main part of the network.
What is the Purpose of a DMZ?
In most computer networks, the most vulnerable components are those computer hosts that are responsible for providing end-user services such as web, DNS (Domain Name System), and email servers. Due to the odds of one of these servers becoming compromised through published or newly discovered exploits, when employing the DMZ concept they are configured to reside within their own sub-network. This allows the remainder of the network to be protected if a rogue actor or hacker is able to succeed in attacking any of the servers.
Any computer host that is placed in the DMZ will have limited connectivity to other hosts that solely reside within the internal network. The DMZ does permit communication across hosts located within the DMZ and to the external network or Internet. This aspect of the DMZ allows servers to provide services to both the external and internal networks. In this configuration, a computer firewall is used to monitor and control the network traffic between the servers located within the DMZ and internal network client computers. Unfortunately, DMZ configurations will not provide much if any protection against internal network attacks such as email spoofing or network traffic analysis or packet sniffing.
What Services are Normally Placed in the DMZ?
Any network service that runs as a server requiring communication to an external network or the Internet can be placed in the DMZ. The most common services placed in the DMZ include: mail or email servers, FTP servers, Web Servers, and VOIP servers. The decision on what server(s) to place within the DMZ is based on the overall computer security policy of an organization and resource analysis of the drawbacks to placement outside of the primary domain.

When configuring an email server to be within the DMZ, the user database and associated email messages are typically stored on servers on the primary domain to keep them further secure from the Internet. This information is able to be accessed from the email server located within the DMZ that is exposed to the external network; however, the mail server is primarily responsible for passing incoming and outgoing email between the internal servers and the Internet.
Network web servers are typically required to communicate with an internal database located on a database server which may contain sensitive information for the organization. As a result, the database server typically resides on the internal network in a DMZ configuration with communications occurring through an application firewall to maintain overall security.
In many business networks, there is also a proxy server installed within the network’s DMZ to help ensure legal compliance with national regulations and to help network administrators monitor end-user behavior while online. This action typically requires employees to use the proxy server to surf the Internet. The proxy server construct can result in reduced Internet bandwidth for network users depending on the number of HTTP requests that are denied and overall configuration of the server.
DMZ Architecture
There are a number of methods to create a network that includes a DMZ. The two most commonly deployed methods are the three legged model (single firewall) and a network with dual firewalls. Each of these primary architectural setups can be further expanded to create a complex network architecture depending on the enterprise or organizational requirements.
Three Legged DMZ Model (Single Firewall)
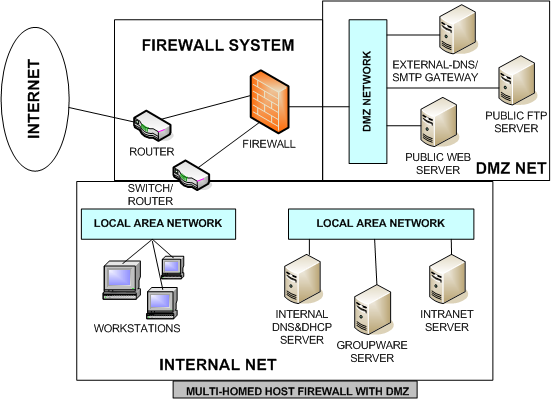
The three legged DMZ model makes use of a single firewall with a minimum of three network interfaces to create the architecture that contains a DMZ. In this configuration, the external network gets created or formed from the Internet Service Provider (ISP) to the network’s firewall on the first network interface. The internal network is then formed from the second network interface, and the network DMZ is created from the third network interface. In the three legged model, the firewall becomes the single point of failure for the overall network. It also must be able to handle all traffic bound for both the DMZ and the internal network. When drawing the network architecture in this model, color codes are typically used to annotate the network zones. Green is normally used to indicate the DMZ, purple for the internal LAN, red for the Internet, and another color to indicate any wireless network zones that are being supported.
Dual Firewall DMZ Model
In order to create a more secure network DMZ, two firewalls can be used to setup the architecture. The “Front-End” firewall is setup to allow traffic to pass to/from the DMZ only. The “Back-End” firewall is then setup to pass traffic from the DMZ to the internal network. The two firewall or dual firewall model is considered to be more secure than the three legged DMZ option since there would have to be two firewalls that would have to be compromised for the network to be compromised. Some organizations even go as far as to use firewalls produced by two different companies to make it less likely that a hacker could use the same security vulnerability to access the internal network.
As an example, if a network administrator makes a setup or configuration error on one firewall brand, he or she would likely make the same mistake on the second one. If a different brand or vendor’s firewall is used for each then the odds of a configuration mistake propagating across each firewall is much lower. The practice of using two different firewalls; however, is more costly and requires additional effort to maintain when compared to the single firewall model.
What is a DMZ Host?
There are some commercially produced network routers for the home that make reference to a DMZ host. When this occurs, the “host” is located on the internal network with all ports open except for those forwarded. In this configuration, the “host” does not act as a pure DMZ, since the host is not separated from the internal network. This comes from the fact that the DMZ host maintains the ability to connect to all hosts located on the internal network. In true DMZ configurations, these connections must be made through a separating firewall. Unfortunately, the DMZ host can provide a false sense of security to new network administrators or managers. Instead, it is normally used as a straight forward method of forwarding ports to another firewall or NAT device.
How to Create a DMZ?
The easiest way to setup a DMZ is to use a firewall that has three or more network interfaces in the three legged DMZ model. In this configuration each of the interfaces will be assigned one of the following roles: internal network, DMZ network, and the external network (Internet). Typically a four-port Ethernet card in the firewall will allow this network configuration to be setup.
How to Setup a DMZ on Linksys
A DMZ can be setup on a Linsys router by turning on the router’s forwarding to an internal host located on the LAN or network being protected.
Step 1 – Connect a computer via Ethernet cable to the Linksys router.
Step 2 – Launch the computer’s web browser and enter the Linksys router’s IP address in the web address tool bar which is typically 192.168.1.1 followed by pressing the “enter” or the “return” key.
Step 3 – Enter the administrator password for the router. The default password on many Linksys models is “admin.”
Step 4 – Select the “Security” menu tab located at the upper portion of the Linksys router’s web interface.
Step 5 – Scroll to the bottom of the security tab Window and select the drop-down box that is labeled “DMZ.” Then, choose the “enable” menu option.
Step 6 – Input an IP address for the destination computer host. This host can be a remote desktop computer, web server, or any computer that needs to be able to access the Internet. The IP address where network traffic is being forwarded must be static. If you use a dynamically assigned IP address, the next time the computer is restarted the forwarding capability may be lost or not work.
Step 7 – Choose the “Save Settings” menu button and then close the router console.
Importance of DMZ Firewall Rules
Once a firewall has been configured as part of a network DMZ, the rule set must be confirmed to protect the DMZ from the Internet as well as protecting the internal LAN or network from the DMZ. By doing this, it will be more challenging for an attacker to gain access to the internal network if obtaining access to a DMZ host or hosts. If unsure as to what the firewall will be configured to do, read the manufacturer’s instructions or specification for the firewall prior to implementing the DMZ. This will help prevent inadvertently placing your network at risk through improper firewall configuration.
How to Disable the DMZ?
Although setting up a DMZ can make sense for many organizations, it can result in small networks placing resources outside of the firewall that do not need to be open to attack. For these cases and others where network administrators need to conduct troubleshooting of the network configuration it may be necessary to disable the DMZ. The following steps demonstrate how to disable a DMZ configuration on Linksys, Netgear, Belkin, and D-Link routers.
Linksys DMZ
Step 1 – Connect a computer to the Linksys router using an Ethernet cable.
Step 2 – Launch the computer’s web browser and enter “192.168.1.1” without the quotes in the web address text field followed by clicking the “enter” or “return” key.
Step 3 – Input “admin” for the router’s password if you have not setup a unique password for the router previously. If you have, then enter the appropriate router password to gain access to the router’s configuration panel.
Step 4 – Choose the “Applications & Gaming” menu option. Then, select the “DMZ” menu choice from the submenu.
Step 5 – Choose the “Disabled” menu option followed by clicking the “Save Settings” menu choice. This action will disable the Linksys router DMZ.
Step 6 – Exit from the router configuration panel to complete disabling the Linksys DMZ.
Netgear DMZ
Step 1 – Connect a computer to the Netgear router using an Ethernet cable.
Step 2 – Launch the computer’s web browser and type router IP address in the web browser’s address bar to obtain access to the router configuration panel.
Step 3 – Enter “admin” for the router’s username and either “1234” or “password” for the router’s password. The password will depend on which version of the router that is being configured.
Step 4 – Choose the “WAN Setup” menu option located under the “Advanced” menu tab.
Step 5 – Unselect the “Default DMZ Server” menu option followed by clicking the “Apply” menu option.
Step 6 – Exit from the Netgear router configuration panel and the DMZ will be disabled.
Belkin DMZ
Step 1 – Connect a computer to the Belkin router using an Ethernet cable.
Step 2 – Open the computer’s web browser and enter ”192.168.2.1” in the web address tool bar.
Step 3 – Leave the password field empty if you have not setup a new password on the router to login to the router configuration panel.
Step 4 – Select the “Security and Firewall” menu option.
Step 5 – Choose the “DMZ” menu option and then uncheck the “Enable” menu selection.
Step 6 – Choose the “Apply Changes” or “Enter” menu button to disable the DMZ on the Belkin router.
D-Link DMZ
Step 1 – Connect a computer to the D-Link router and open a web browser.
Step 2 – Enter “192.168.0.1” in the web address text field followed by clicking the “enter” or “return” key on your computer.
Step 3 – Login to the router’s configuration panel using “Admin” for the username and no entry for the password.
Step 4 – Choose the “Advanced” menu option from the primary menu option.
Step 5 – Click the “Firewall Settings” menu option located on the left-hand side of the configuration screen.
Step 6 – De-select the “Enable DMZ” menu option. Then, select the “Save Settings” menu option to complete disabling the D-Link DMZ.


Follow Us!