MacBook and MacBook Pro notebooks from Apple all use either a Mini-DVI, a Mini-DisplayPort or a Thunderbolt port for connecting display devices. MacBooks from 2008 and prior use Mini-DVI, those from 2009 till 2011 use Mini-DisplayPort, and those since 2011 use the new Thunderbolt port.
If your TV doesn’t have these ports, and chances are it doesn’t, you will need an adapter to connect your TV to your MacBook or MacBook Pro. Almost all digital TVs today have either an HDMI port, a VGA port, a DVI port or all of them.
The adapter you will need depends on which port is available on your TV, which is on your MacBook, and which do you prefer to use.
MacBooks with Mini-DVI
If you have an older MacBook (or MacBook Pro) with a Mini-DVI port you will need a Mini-DVI to HDMI adapter, a Mini-DVI to VGA adapter or a Mini-DVI to DVI adapter. Mini-DVI to DVI would probably be the best option given that it merely converts between two types of the DVI standard itself, while still being more advanced than VGA.
All of these are available from multiple manufacturers, and can be found through Apple or other stores. Buying them from Apple is generally more expensive.
Some of these also come in form of cables with Mini-DVI at one end and the chosen port on the other, so they can be connected directly to the TV without a separate cable.
MacBooks with Mini-DisplayPort

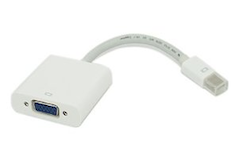
Most people are likely to have a Mini-DisplayPort (MiniDP or MDP for short) on their MacBook (Pro), and there are adapters for them aplenty. Just as with Mini-DVI you will need either a MiniDP to HDMI, MiniDP to VGA or MiniDP to DVI adapter.
Cables may also be an option with a MiniDP connector on one end and HDMI, VGA or DVI on another.
MacBooks with Thunderbolt
If you have a MacBook Pro from 2011 or newer it will have a Thunderbolt port. Being a new standard for connecting peripherals, including displays, more and more TVs may support Thunderbolt directly so if you happen to buy a TV with a Thunderbolt port you won’t need any adapters, just a standard Thunderbolt cable with male connectors on both ends.
If you don’t have a Thunderbolt port on your TV, however, you can safely treat your Thunderbolt port as a Mini-DisplayPort, and use it with any of the Mini-DisplayPort adapters mentioned above. Thunderbolt port is backwards compatible with Mini-DisplayPort.
Potential Issues
Quality and reliability of adapters vary between manufacturers, and in some cases seem to be a hit or miss. Many people have had issues with a Mini-DisplayPort to HDMI adapter, where it stopped working after a while, and the solution was hard to come by aside from buying a new adapter.
A problem may be caused by a Mac OS X update changing HDMI support, and by the firmware of your TV being out of date. Mechanical issues may also be possible where the adapter is damaged through lack of proper care.
If you have problems with your Mini-DisplayPort to HDMI adapter you could search Apple’s MacBook support forums for some possible solutions. A very popular thread that has been running for a while can be found here, and it is packed with suggestions that may work for you.
It is possible that VGA ports would be the most reliable because they lack any DRM that is involved with the HDMI standard, and which may sometimes cause issues. It may be the safest fall back if everything else fails.
Sound to TV
HDMI supports piping sound from a MacBook to a TV, but the adapter and the TV will have to support this feature. The safest bet with regards to sound, however, will always be to connect speakers directly to your Mac’s audio port or use Mac’s own speakers.
If your TV has a line-in audio port it may also be possible to connect a male-to-male audio jack from the MacBook’s audio port to the TV’s line-in port.
An alternative: wireless display
If you already have a PC or a Mac connected to a TV as a second monitor, and occasionally wish to use it as a second monitor for your MacBook Pro as well, there is a program called ScreenRecycler that can turn your Windows or Mac connected display into a second screen for your MacBook over a wireless connection. No need for any cables or adapters.
ScreenRecycler is a specialized VNC server that creates a virtual second screen when a VNC client on the second computer on the same wireless network connects to it. Connecting to it using a VNC client allows you to see this second virtual screen in a window or in full-screen, effectively turning your Windows or Mac connected display into a second monitor.
The disadvantage of this approach is that lag of your wireless network can create a lag in refreshing the picture on this second screen as well as the appearance of artifacts when you move windows and elements on the screen. Because of this it isn’t a good solution for video playback, gaming, and similar uses.
It is, however, a decent solution if you don’t need this feature often, and just need the second screen to display something more static. It could be usable for web browsing, looking at pictures (so long as you don’t mind waiting a few seconds for the pictures to fully draw on the screen), watching static presentations, spreadsheets, reading or even editing some text.

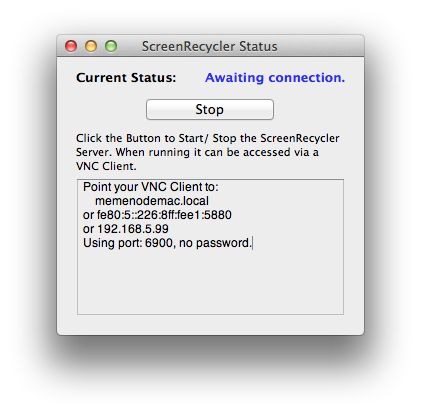
To use this just install ScreenRecycler, which can be downloaded as a free trial or bought from the ScreenRecycler site, launch it, and it will instruct you to point your VNC client to a specified address. On the second computer you would use a VNC client such as TinyVNC, RealVNC or JollysFastVNC (for Mac) , enter the specified address, and connect. The second virtual screen from your MacBook will appear in a window or full-screen depending on your settings. You can tweak the settings of your VNC client to achieve optimal performance.


Follow Us!