When a document or other item is printed to a file instead of a local or networked printer, it allows the file to be saved in a format that can be used by a different printer. Information such as page and line breaks, font spacing, and other layout information is saved when printing a document to a file. This allows the printer to reproduce the version of the file that the end-user sees on the screen without having to have access to the software application or computer that created the file. A common reason for printing to a file is to send a document or photo to a third party to print the information at a higher resolution or in greater quantities than is economically feasible on the local printer. As a result, a common task that arises for computer users is determining how to print to a file.
What Are the Reasons to Print to a File?
Some of the common reasons to print to a file vice the local printer are:
1 – To be able to print a document at a later time without having to open it in the software that originally created the file such as a commercial printing shop or at home/work.
2 – To save a document to a PDF file that can be used or printed on a computer which does not support the software program used to create the document.
3 – To email a file to another person to print that does not have the software program used to create the file. In this case, the person sending the file would need to have the appropriate printer driver installed on their computer. Alternatively, the person receiving the file would need to have the same printer driver as the person sending the file.
Why Print or Save to a PDF File?
The Portable Document Format (PDF) format is popular in academia and industry since it represents documents in a consistent manner across operating systems. A file saved in PDF contains a full description of a flat, fixed-layout document to include the font, text, graphics, and other required information to display or print the file. Although the document specification began as a proprietary format of Adobe, it has been free to use since 2001 and was released as an open standard in the summer of 2008. When choosing a file format that will be reviewed by multiple users across a variety of computing systems, the PDF format eliminates the inconsistencies found across software vendor and versions that is found with other common file formats such as DOC, DOCX, TXT, and RTF. As industry adoption of the PDF standard has matured, the requirement to use a printer driver to save documents in PDF format has been encapsulated into many Word Processing applications to include MS Office products, Open Office, Libre Office, and Google Documents. A PDF printer driver is still required to print to PDF format from software packages that do not include a native PDF saving capability.
How to Print to a PDF File Using Google Docs
Google Docs is a free, online-based office productivity suite offered by Google that supports saving documents to PDF format without a specific PDF printer driver installed on the client computer. The service has been recently upgraded or rebranded to Google Drive.
Step 1 – Register for a Google account if you do not already have one.
Step 2 – Login to the Google account. Then, select the “Documents” link at the top of your web browser’s screen or directly navigate to Google Docs.
Step 3 – Create a new document by clicking the “Create” menu button located on the left-hand side of the webpage. Alternatively, select the “Upload” menu icon located next to the create button to upload a Word or other supported document type to Google Docs.
Step 4 – Select the “File” and “Download as” menu options from the document file menu.
Step 5 – Choose the “PDF Document” type from the subsequently displayed menu.
Step 6 – The PDF file will now be downloaded onto your client computer. You can launch the PDF file to view before forwarding, printing, or sharing with others to verify the look and feel of the document.
How to Print to a PDF File Using Open Office
Open Office, or as now branded Apache Open Office, is an open source productivity suite of software tools that support saving document and file types as PDF. The components of the application suite include tools for creating spreadsheets, word documents, graphics, presentations, and databases and are supported across a number of operating systems to include Windows, Linux, Mac OSX, and Unix. Apache Open Office does not require a separate PDF printer driver to save documents as the PDF file type.
Step 1 – Download and install Open Office from the new Apache homepage of the project if not already installed on your computer.
Step 2 – Launch the application and choose the Open Office Writer package to create or load a previously created word document.
Step 3 – Select the “File” and “Export as PDF” menu options.
Step 4 – Enter a file name and select the “Save” menu button. The file will now be saved as a PDF file type.
How to a Print to a PDF File Using Libre Office
LibreOffice is an open source office productivity suite that is developed by The Document Foundation and supports saving files to PDF file type. The software package was originally created by a fork of the Open Office project and supports a number of computer operating systems to include Mac OS X 10.4 or newer, Linux-based OS’s running kernel version 2.6.18 or newer, Windows, and has ports for NetBSD, OpenBSD, and FreeBSD. LibreOffice is also the default office productivity suite included in a number of Linux distros.
Step 1 – Download and install LibreOffice.
Step 2 – Launch the application after installation.
Step 3 – Select the LibreOffice Writer application. Then, create a new document or upload a previously existing file.
Step 4 – Click the “Export as PDF” menu icon or select the “File,” and “Export as PDF” menu options.
Step 5 – Enter a unique file name, and then click the “Save” menu button.
How to Print to a PDF File Using Microsoft Word
Starting with Microsoft Office 2010 and newer, Office software applications include the ability to save documents to PDF format without installing a separate PDF printer driver.
Step 1 – Launch Microsoft Word 2010.
Step 2 – If you are not sure what version of Word that is installed on your computer, select the “File” and “Help” menu options from the main Word file menu. The right-hand side of the screen will display the version of Word that is installed on your computer. If you do not have Word 2010 or newer installed, you will either need to install a free PDF printer driver or upgrade the version of Word on your computer to print or save to PDF format.
Step 3 – Create a new or load a previously created Word document in MS Word.
Step 4 – Select the “File” and “Save As” menu options from the main file menu in Word.
Step 5 – Choose the “PDF” type from the file type drop-down menu list and click the “Save” menu button. The PDF file will now be created from the document loaded in Word.
How to Print to a PDF File Using a Free PDF Printer Driver
Another option to print to a PDF file is to install a free PDF printer driver on your computer such as PDF Creator supported by the developers at PDFForge. Most software programs that have a printing functionality will now be able to print to a PDF file once the driver is installed.
Step 1 – Download the PDF Creator printer driver from the PDFForce website.
Step 2 – Double click the installation file and install on your computer.
Step 3 – Launch the application that you want to print information to a PDF file.
Step 4 – Select the “File” and “Print” menu options (or equivalent for the software program you are using).
Step 5 – Change the printer to the “PDF Creator” menu option and then click the “Print” menu option. The PDF file will now be created and saved on the selected destination drive of your computer.
How to Print to a File Using Google Cloud Print
Google Cloud Print now allows users to connect work or personal printers to the Internet. Using the service provide by Google, a file can be printed remotely by supported applications on printers that support Internet connectivity.
Step 1– Install Google Chrome on the computer that you will use with Google Cloud Print.
Step 2 – Connect the printer to the computer and ensure it is turned on and works locally. This should be accomplished with a desktop or other computer that will not be leaving the office or home.
Step 3 – Launch Google Chrome and select the “Wrench” icon located in the upper, right-hand corner of the web browser.
Step 4 – Choose the “Options or “Preferences” menu option and then click the “Under the Hood” menu choice.
Step 5 – Select the “Sign in to Google Cloud Print” menu choice and sign in with your Google account. This step will enable the “Cloud Print Connector” on the computer.
Step 6 – Select “Finish printer registration” message once it appears on the computer screen.
Step 7 – View the success confirmation message and then click the “Manage your printers” link.
Step 8 – Test printing a document from Google Docs or Chrome after setup is complete by choosing the “Print with Google Cloud Print” menu option on the printing options screen. The printer should print the document after you select the “Print” menu button and the printer will now be setup to print a file from the cloud remotely.
How to Print to a File from an Application
Most major software applications that support editing documents or files include a “Print to a File” menu option.
Step 1 – Launch the program that you will print a document to a file from.
Step 2 – Load the document to print by selecting the “File” and “Open” menu options or equivalent for the software program.
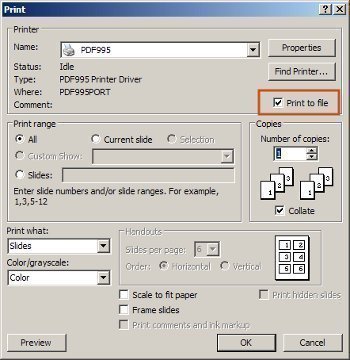
Step 3 – Choose the “File and “Print” menu options from the main file menu.Printing to a File from an Application
Step 4 – Choose the “Print to File” menu option located in the “Print Dialogue” menu box.
Step 5 – In the “Save As” dialog menu that opens, choose the folder to save the file. Do not remove the “.prn” file type appended to the file name.
Step 6 – Select the “Print” menu option and the print to a file operation will be completed.
How to Create a Print to File Printer
There are some software applications that do not have the ability to print to a file built in to the program. On the Windows Operating System, a new Windows printer can be created to automatically print to a file if this is the case on your computer.
Step 1 – Open the “Printers” folder on the computer. Then, click the “Add Printer” menu option located beside installed printers on the computer.
Step 2 – Choose the option to add a local printer. Turn off the auto-detect option since this printer will be manually added to the computer.
Step 3 – Choose “FILE:” in the port section of the printer. If this section does not display by default, choose the “Create a New Port” menu option and then enter “FILE:” as the port name. This will cause the end-user to be queried for a path-name in a dialog box when selecting the printer to print to a file.
Step 4 – Save the settings and choose this printer when printing to a file from the program in the future. A unique file path should be entered for the port name to avoid overwriting previously created files.
How to Print to a File Remotely
Another common requirement that arises for computer users is determining how to install a printer driver locally for a remote printer.
Step 1 – Choose the “Start” menu button and open the Windows Control Panel.
Step 2– Choose the “Printers and Other Hardware” menu option.
Step 3 – Click the “Printers and Faxes” menu choice and then double click the “Add Printer” menu option.
Step 4 – After the “Add Printer Wizard” is started, choose the “Next” menu button.
Step 5 – Select the “Local printer” menu choice and then clear the “Automatically detect and install” check box followed by selecting the “Next” menu button.
Step 6 – Choose the “Create a new port” menu option and select the “Local Port” in the “Port Type” menu section.
Step 7 – Enter the path in the “Port Name Box” to the printer. An example format would be:
myServerprinter name.
Step 8 – Choose the “Next” menu button followed by selecting the appropriate driver for the printer.
Step 9 – Select the “Next” menu button and follow the default Windows Printer Wizard instructions to complete installation of the remote printer driver locally.


Kostenzer
How to Print to a PDF File Using WordPerfect
Step 1 – Launch WordPerfect
Step 2 – Open File
Step 3 – Pubish to PDF
Step 3 – Give a name to the to the to be create PDF file.