A Virtual Private Network (VPN) is typically used by companies, schools, and other organizations when they want to allow remote access to their servers, printers, and other network devices without compromising security. A VPN therefore extends a private network across the internet, but protects this connection by encrypting it, thereby creating what many refer to as a tunnel through the public internet.
VPNs have other uses though, such as securing your internet connection to protect your privacy and allow you to bypass censorship. Ideally, everyone should consider using a VPN, and here we show you how to get started.
Using a VPN Service
1. Choose a VPN service
The easiest way to get set up with a VPN is to use one of many VPN service providers. In a nutshell all you need to do is sign up, download their software, and connect. To choose the right one for you there are a few things you should consider:
1. Which country options do they offer?
When you connect through a VPN you will appear as if you are visiting from the country in which the VPN server you are connected through resides. One example of why this might be relevant is if you want to access content available to a specific country (such as UK or US). In that case you’ll need to have an option to connect to a VPN server in that country. Most VPN providers offer multiple choices, but free ones typically offer only one.
2. Do they save logs of your activity while connected to a VPN?
VPN providers aren’t exactly immune to government ordering them to hand over their data as part of some kind of investigation, so if the VPN provider logs this data there is a chance your privacy might be compromised (even if you really did nothing wrong). Maximum privacy is ensured if the logs aren’t being kept at all, or are deleted periodically and often.
3. Does their software support your operating system?
Most support Windows, but if you are a Mac user or a Linux user you should make sure that there is a supported way for you to connect as well. Some VPNs also support mobile operating systems such as iOS and Android, so if you have a smartphone or a tablet that you might want to connect through a VPN as well choose a provider that offers these mobile options as well.
4. How fast is the connection and how much bandwidth is offered?
Speed should ideally be above the speed of your home internet connection so you don’t actually feel a slow down when connected through a VPN. For example, if your connection at home is 10 Mbit/s your VPN’s connection should be 10 Mbit/s or more.
Bandwidth refers to how many gigabytes of data can you use up when connected through a VPN. Ideal is unlimited, but if it’s 100GB or more you’ll probably be fine.
Free VPN services tend to have severe limitations to these, so for optimal service paid VPNs are the best option.
5. What’s the price? Free or paid?
With VPNs you really only get the full service if you pay a little, but free is a possibility if you can live with a limited connection speed, a bandwidth cap, only a single available country, and other limitations.
Among paid VPNs prices start as low as $6 a month, or even lower if you pay a year in advance, and they typically have all you’ll probably need.
A few of the good options to consider include Private Internet Access, PrivateTunnel, IPREDATOR, Faceless.me, Privacy.io, Cryptocloud.com, ProXPN, and others.
2. Sign up and install the software
Once you’ve chosen your VPN provider just sign up for it, as part of which you would enter your email address and set up your password, and then download and install the software they offer for your operating system.
3. Log in, choose a server and connect
When you launch the software you’ll usually be asked to enter your VPN account’s username and password. Once you enter it you should be able to choose which server, in which country, you want to connect through. Once you make your choice just click to connect and you’ll be surfing the internet privately through a VPN.
Some providers also offer apps for Android and iOS so you can connect your smartphone through the same VPN service as well. The process is the same. You’ll be directed to the download for your phone, and once it is installed, launch it, enter your VPN username and password, select a country, and connect.
Create Your Own VPN
It is also possible to create your own VPN, and there are multiple methods of doing that. The easiest one is to use the utilities built into Windows 7 and Windows 8.
This is most useful if you want to be able to access your home network even while you are away, with added security if you happen to be on an open wireless connection. However, the connection between your VPN enabled computer at home and the internet is still trackable by your ISP. To prevent that you would still need one of the above services or any other external VPN. Most people will probably be best served by simply getting a VPN service as described above.
For those who still want to set up their own VPN for any reason here is how to do it.
1. Open the Control Panel. In Windows 7 just open the Start menu and click on Control Panel. In Windows 8 press the Windows button and just start typing “Control Panel”. When it finds it click on it to open.
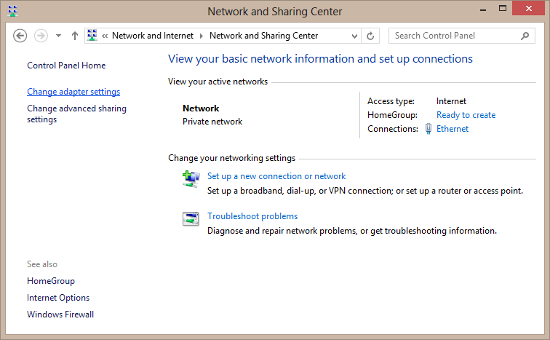
2. Click on Network and Internet, then Network and Sharing Center, then on the left sidebar click on “Change Adapter Settings.

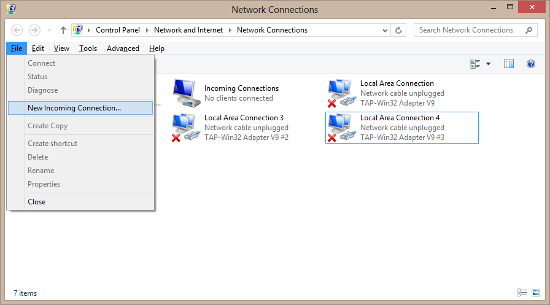
3. This will open a list of existing connections. There should be a menu near the top of the window, but if it doesn’t appear just press Alt to show it. Then go to File > New Incoming Connection to start a wizard for creating a new connection.

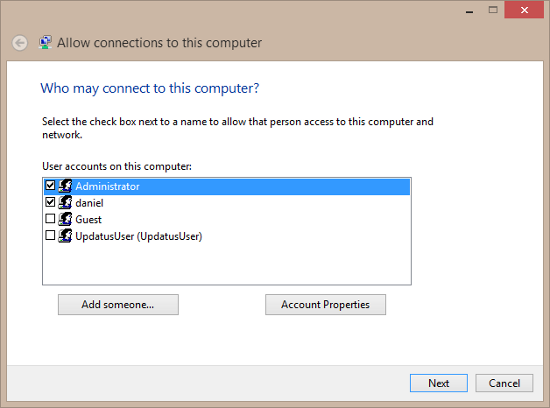
4. The first step is to select who can use the connection. Make sure to at least select yourself, that is, the current user account you are using. It’s not a bad idea to select the Administrator as well. Then click next.

5. Next it will ask “How will people connect?”, but the only option shown is “Through the Internet”. Leave that selected and click Next.
6. On the screen that follows you can select types of networking software that can be used to connect. Leaving it as is should be fine. Just click “Allow access”.
7. Finally it will show your Computer name. Write it down exactly for later, as you will need it.
8. Find out the IP address of your computer on the local network. You can do this by pressing the Start menu and searching for “cmd” (in Windows 8 press the Windows key and do the same). This will find the Command Prompt program. Open it, and in it, type “ipconfig” and press enter.
This will list out a bunch of information. Look for the ethernet adapter for your current connection, which may look something like “Ethernet adapter Ethernet”. Under that look for the IPv4 address, which will look something like 192.168.5.100. That’s your IP address. There is also a Default Gateway listed below, which is something like 192.168.5.1. Write both down.

9. Set up port forwarding in your router. To do this open your web browser (Chrome, Firefox, Internet Explorer etc.) and type in the Gateway Address you just wrote down. This will access your router and ask you for your router’s username and password. If you haven’t set it previously it’s likely you have the default username and password set, which should be noted in the manual of your router, or which you can find online if you know the model of your router. It could be something like “admin” for the username and “0000” as the password, but it is a bit different for each router.
Once you login to your router explore the various settings pages, which look differently on various routers, until you find Port Forwarding settings. You need to set up the port 1723 to forward to your IP address, which you wrote down earlier. This is the port VPNs connect to. Then save your settings, at which point your router may restart. Let it finish restarting.
At this point you have your VPN and have allowed connections to it. Now we just need to test connecting to your new VPN, for which you need a separate computer.
Connect to Your Own VPS
1. On the second computer running Windows 7 or Windows 8 go to Control Panel, then Network and Internet, and then “Network and Sharing Center”.
2. Now click on “Set up a new connection or network” below the list of active networks. This will start a wizard.
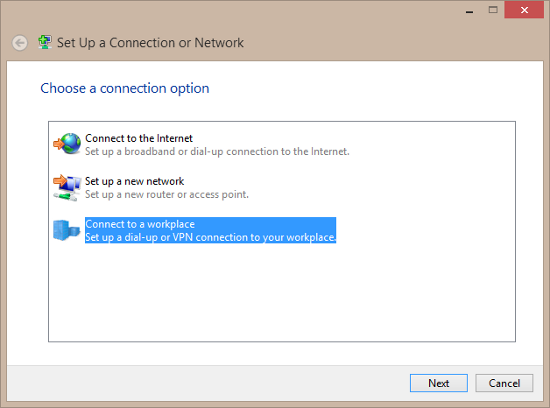
3. In the wizard dialog that appears click on “Connect to a workplace”, and click Next.

4. In the next screen click on “Use my Internet connection (VPN)”.
5. Now you need to enter the IP address of your first computer, which you saved before. So it could be something like 192.168.5.100.
6. Next Windows will show you the new connection, and allow you to connect to it. When you try to connect you’ll have to enter your first computer’s username and password. If the connection is successful, and after connecting you can surf the internet with your second computer even if you disconnect its main internet connection then your VPN is working.
However, to be able to connect to your VPN from outside of your home network (like when you are on a public WiFi network somewhere else), instead of entering your local IP address (such as 192.168.5.1) you would need to enter the public IP address of your computer. You can get this by going to your first computer and visiting whatismyip.com.
The only remaining issue is that this IP address tends to change on a daily basis, if not more often, as most ISPs perform quick daily reconnections and thus reassign a new IP address to your computer. To fix that you’d need to set up a static IP address or domain name that always routes to whatever your current home IP address is. You can get such services from companies like No-IP.com, usually free.
Once you set up an unchanging IP address or domain name for your home VPN computer, you would just need to enter that address when setting up your other computer’s connection to your VPN.


Follow Us!