On Overview on Group Policy Object (GPO) Implementation and the Group Policy Object Editor
Group Policy settings are stored in a Group Policy Object (GPO). The types of Group Policy settings which can be stored in a GPO are listed below:
- Computer configuration settings are located in the Computer Configuration node.
- User configuration settings are located in the User Configuration node.
A Windows 2000 and Windows Server 2003 computer has a local GPO. A local GPO exists only on that particular computer, and therefore only affects the computer on which it is located.
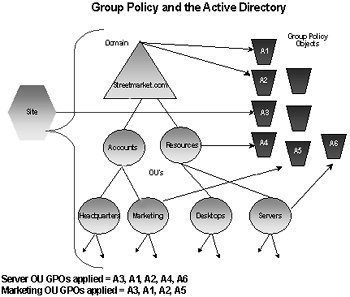
Nonlocal GPOs, also known as Active Directory based GPOs, are created in Active Directory and stored on domain controllers. This means that Group Policy settings in Active Directory are symbolized by Group Policy objects (GPOs). Nonlocal GPOs are used to manage and control the configuration settings of users and computers in Active Directory. Before you can create any nonlocal GPOs, you must have Windows 2000 or Windows Server 2003 domain controllers installed and running within your environment. For a nonlocal GPO to be applied to a user object or computer object in Active Directory, the GPO has to be linked to a site, domain, or organizational unit (OU) to which the user or computer belongs. 
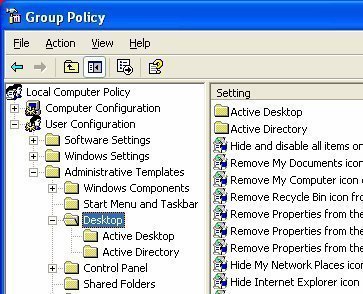
The tool which is used to select the Group Policy settings located in a GPO, and to organize and manage these policies, is the Group Policy Object Editor. The manner in which you need to access the Group Policy Object Editor is based on the location at which the particular GPO has to be linked and applied. This concept is illustrated below:
- To link a GPO to the local computer, you have to open the locally stored GPO using a MMC. To open the MMC for the local computer, use the steps below:
- Open the Microsoft Management Console. To do this, click Start, Run, and enter mmc in the Run dialog box. Click OK.
- In the File menu, click Add/Remove Snap-In.
- When the Add/Remove Snap-In dialog box opens, click Add in the Standalone tab.
- When the Add Standalone Snap-In dialog box opens, click Group Policy Object Editor. Click Add.
- Verify that Local Computer is displayed under Group Policy Object, on the Select Group Policy Object dialog box.
- Click Finish.
- On the Add Standalone Snap-In dialog box, click Close.
- On the Add/Remove Snap-In dialog box, click OK.
- You can now access the local GPO using the MMC.
- To link a GPO to a different local computer, open the local GPO on the computer running Windows 2000 or Windows Server 2003 using a MMC, and locate the other computer.
- To link a GPO to a site, you have to open the Group Policy Object Editor from the Active Directory Sites And Services console. To open the Group Policy Object Editor by using the Active Directory Sites And Services console, use the steps below:
- Click Start, Administrative Tools, and click Active Directory Sites And Services.
- In the console tree, locate and right-click the site to which you want to link a GPO, and click Properties on the shortcut menu.
- When the Properties dialog box for the site opens, click the Group Policy tab.
- In the Group Policy Object Links list, click New and then click Edit to create a new GPO, or choose an existing GPO in the Group Policy Object Links list, and then click Edit.
- The Group Policy Object Editor opens for the site GPO.
- To link a GPO to a domain, you have to open the Group Policy Object Editor from the Active Directory Users And Computers console. To open the Group Policy Object Editor using the Active Directory Users And Computers console, follow the steps below:
- Click Start, Administrative Tools, and click Active Directory Users And Computer.
- In the console tree, locate and right-click the domain (or OU) to which you want to link a GPO, and click Properties on the shortcut menu.
- When the Properties dialog box for the domain opens, click the Group Policy tab.
- In the Group Policy Object Links list, click New and then click Edit to create a new GPO, or choose an existing GPO in the Group Policy Object Links list, and then click Edit.
- The Group Policy Object Editor opens for the domain GPO.
- To link a GPO to an organization unit (OU), you have to open the Group Policy Object Editor from the Active Directory Users And Computers console.
The remainder of this Article focuses on the implementing and managing GPOs. The main management tool used for this is the Group Policy Object Editor.
How to create a GPO
Creating a GPO is the initial step in ultimately applying Group Policy settings to user objects, and computer objects in Active Directory. When you create a new GPO, it is by default linked to the site, domain, or OU which was selected, when the GPO was created. The Group Policy settings stored in the GPO are applied to that particular site, domain or OU. You can though, at a later stage, link the GPO to other sites, domains, or OUs.
To create a GPO,
- You need to open the Active Directory Sites And Services console if you want to create a GPO for a site. To open the console, click Start, Administrative Tools, and click Active Directory Sites And Services. You have to use the Active Directory Users And Computers console if you want to create a GPO for a domain or OU. To open the console, click Start, Administrative Tools, and click Active Directory Users And Computers.
- In the console which you opened, locate and right-click the site, domain or OU that you want to create a GPO for, and then click Properties on the shortcut menu.
- When the Properties dialog box for the site, domain or OU opens, click the Group Policy tab.
- Click New.
- Provide a name for the GPO.
- Click Close.
- The new GPO is linked to the site, domain, or OU which you chose in the MMC, by default. The Group Policy settings contained in the GPO are applied for objects in that particular site, domain, or OU.
How to create a MMC (Group Policy Object Editor) for a newly created GPO
It is recommended to create a MMC for a GPO so that you can open it from the Administrative Tools menu whenever you need to access the GPO.
- Click Start, Run, and enter mmc in the Run dialog box. Click OK.
- In the File menu, click Add/Remove Snap-In.
- When the Add/Remove Snap-In dialog box opens, click Add in the Standalone tab.
- When the Add Standalone Snap-In dialog box opens, click Group Policy Object Editor. Click Add.
- In the Select Group Policy Object dialog box, click the Browse button to find the GPO which you want to create a MMC for.
- When the Browse For A Group Policy Object dialog box opens, select the All tab. Select the GPO, and Click OK
- On the Add Standalone Snap-In dialog box, click Close.
- On the Add/Remove Snap-In dialog box, click OK.
- To save the MMC so that it is displayed under the Administrative Tools menu, click Save As on the File menu.
- Provide a name for the GPO MMC in File Name text box, and select Save.
How to configure Group Policy settings for a GPO
After you have created a MMC (Group Policy Object Editor) for a new GPO, you can access it to configure Group Policy settings for the GPO.
- Open the Group Policy Object Editor for the GPO on the Administrative Tools menu.
- Proceed to expand the node which contains the Group Policy setting which you want to configure.
- Right-click the Group Policy setting which you want to configure, and click Properties on the shortcut menu.
- When the Properties dialog box for the Group Policy setting opens, the options available on the Settings tab are listed below.
- Not Configured, no changes are made to the Registry for the Group Policy setting.
- Enabled, activates the processing of the Group Policy setting.
- Disabled, the Registry reflects that the Group Policy setting is not applicable for users and computers.
- Click the Enabled option to have this particular Group Policy setting applied to users and computers that are within the scope of the GPO.
- Click OK.
How to disable Group Policy settings which are not being used in a GPO
You can speed up computer startup time and user logon time by disabling Group Policy settings in the GPO that are not being used. For instance, if the User Configuration node for the GPO only contains Group Policy settings that are set to Not Configured, it is recommended to disable the actual User Configuration node. This in turn prevents the unnecessary processing of these Group Policy settings.
- Open the Group Policy Object Editor for the particular GPO.
- Right-click the root node and click Properties on the shortcut menu.
- When the Properties dialog box for the GPO opens, you can do one of the following:
- Click the Disable User Configuration Settings checkbox, to disable the processing of user configuration settings.
- Click the Disable Computer Configuration Settings checkbox, to disable the processing of computer configuration settings.
- Click OK.
How to change the default processing order of GPOs
The default processing order in which Group Policy settings stored in GPOs are applied to a user object or computer object is listed below:
- Local GPO.
- Site GPO.
- Domain GPO.
- OU GPO.
When multiple site GPOs, domain GPOs and OU GPOs exist, the order in which they are processed can be specified. You can change the processing order of GPOs for a site, domain, or OU by using the steps listed below:
- To change the processing order of GPOs for a site, click Start, Administrative Tool, and click Active Directory Sites And Services. To change the processing order of GPOs for a domain or OU, click Start, Administrative Tool, and click Active Directory Users And Computers.
- Right-click the particular site, domain, or OU whose GPO processing order you want to change, and click Properties on the shortcut menu.
- When the Properties dialog box for the site, domain, or OU opens, click the Group Policy tab.
- Click the GPO in the Group Policy Object Links list, and use the Up button or the Down button to change the processing order of the GPO.
- The GPO located at the top of the list has the highest priority. GPO processing of the GPOs in the list starts at the bottom of the list, and moves up the list.
How to configure the No Override option
The No Override option allows you to set that for a particular GPO, no other GPOs are able to override its Group Policy settings.
- To configure the No Override option for a site, click Start, Administrative Tool, and click Active Directory Sites And Services. To configure the No Override option for a domain or OU, click Start, Administrative Tool, and click Active Directory Users And Computers.
- Right-click the particular site, domain, or OU to which the GPO is linked, for which you want to configure the No Override option, and click Properties on the shortcut menu.
- Click the Group Policy tab.
- Choose the GPO, and click Options.
- When the Options dialog box for the GPO opens, click the No Override checkbox.
- Click OK.
How to configure the Block Policy Inheritance option
The Block Policy Inheritance option makes it possible you to override Group Policy setting inheritance for a specific OU. When enabled, the Block Policy Inheritance option enables you to stop the specific OU from receiving Group Policy settings from OUs located higher up in the tree.
- To configure the Block Policy Inheritance option for a site, click Start, Administrative Tool, and click Active Directory Sites And Services. To configure the Block Policy Inheritance option for a domain or OU, click Start, Administrative Tool, and click Active Directory Users And Computers.
- Right-click the particular site, domain, or OU for which you want to configure the Block Policy Inheritance option, and click Properties on the shortcut menu.
- Click the Group Policy tab.
- Click the Block Policy Inheritance checkbox
- Click OK.
- The site, domain, or OU which you chose will not obtain Group Policy settings from sites, domains, or OUs higher in the tree. However, if a GPO has the No Override option enabled, the GPO will not be blocked.
How to filter the scope of a GPO
For the Group Policy settings stored in a GPO to apply to users, the users must have the Read (Allow) permission and Apply Group Policy (Allow) permission for the GPO. Users, who are members of the Authenticated Users group, have these permissions by default. Therefore, all these users are included in the scope of GPOs linked to the sites, domains, or OUs to which they belong. Because of this, it might be necessary to filter the scope of the GPO so that it applies only to the appropriate security groups. The ways you can do this it by:
- For the Authenticated Users group, uncheck the Apply Group Policy – Allow permission. Next, for each security group to which the particular GPO should apply, configure the Read (Allow) permission and Apply Group Policy (Allow) permission.
- For each security group to which the particular GPO should not apply, configure the Apply Group Policy (Deny) permission.
You can use the method outlined below to filter the scope of a GPO:
- Open the Group Policy Object Editor for the particular GPO.
- Right-click the root node and click Properties on the shortcut menu.
- When the Properties dialog box for the GPO opens, click the Security tab.
- In Group Or User Names, select the security group.
- Set the appropriate permissions.
How to configure the Loopback setting
- Open the Group Policy Object Editor for the particular GPO.
- Proceed to expand Computer Configuration, Administrative Templates, System, and then expand Group Policy.
- Double-click User Group Policy Loopback Processing Mode in the Setting pane.
- When the User Group Policy Loopback Processing Mode Properties dialog box opens, select Enabled.
- Select either Replace mode, or Merge mode.
- Click OK.
How to link an existing GPO to other sites, domains, or OUs
- To link an existing GPO to a site, click Start, Administrative Tool, and click Active Directory Sites And Services. To link an existing GPO to a domain or OU, click Start, Administrative Tool, and click Active Directory Users And Computers.
- Right-click the particular site, domain, or OU that the GPO should be linked to, and select Properties on the shortcut menu.
- When the Properties dialog box for the site, domain, or OU opens, click the Group Policy tab.
- Click Add.
- When the Add A Group Policy Object Link dialog box opens, click the All tab.
- Select the GPO that should be linked to the particular site, domain, or OU.
- Click OK.
How to delegate administrative control of a GPO
Before looking at the manner in which to configure delegation of control of a GPO, lets first look at the default GPOs permissions assigned to the ifferent security groups. This information is useful when you need to determine to which user(s) you want to delegate administrative control to, and the permissions which the user would need.
- Enterprise Administrators group: Read, Write, Special Permissions, Create All Child Objects, and Delete All Child Objects.
- Domain Administrators group: Read, Write, Special Permissions, Create All Child Objects, and Delete All Child Objects.
- System group: Read, Write, Special Permissions, Create All Child Objects, and Delete All Child Objects.
- Enterprise Domain Controllers group: Read, and Special Permissions.
- Authenticated Users group: Read, Special Permissions, Apply Group Policy.
- Group Policy Creator Owner group: Special Permissions.
From this, it is clear that only members of the following groups can by default create new GPOs:
- Enterprise Administrators, Domain Administrators, System, and Group Policy Creator Owner.
However, by delegating administrative control of a GPO, you can specify that a user or group of users be allowed to perform the following GPO administrative tasks:
- Create GPOs.
- Link GPOs.
- Edit GPOs.
Use the steps below to delegate administrative control of creating GPOs:
- Click Start, Administrative Tools, and click Active Directory Users And Computers.
- In the console tree, proceed to click Users.
- In the details pane, double-click Group Policy Creator Owners.
- When the Group Policy Creator Owners dialog box opens, click the Members tab.
- Click Add.
- In the Enter The Object Names To Select box, specify the name of the user(s) or group that should be allowed to create GPOs. Click OK.
- Click OK on the Group Policy Creator Owners dialog box.
Use the steps below to delegate administrative control of linking GPOs:
- Click Start, Administrative Tools, and click Active Directory Users And Computers.
- In the console tree, proceed to right-click the OU for which you want to delegate authority for a user to link GPOs, and click Delegate Control.
- The Delegation Of Control Wizard launches.
- Click Next on the Welcome To The Delegation Of Control Wizard page.
- Click Add on the Users Or Groups page.
- Enter the name of user or group that should be able to link GPOs for the OU in the Enter The Object Names To Select box on the Select Users, Computers, Or Groups dialog box. Click OK. Click Next.
- When the Tasks To Delegate page appears, click Delegate The Following Common Tasks.
- Enable the Manage Group Policy Links checkbox. Click Next.
- Click Finish on the Completing The Delegation Of Control Wizard page.
Use the steps below to delegate administrative control of editing GPOs:
- Open the Group Policy Object Editor for the particular GPO.
- Right-click the root node and click Properties on the shortcut menu.
- When the Properties dialog box for the GPO opens, click the Security tab.
- In Group Or User Names, select the security group which should be allowed to edit GPOs.
- Set the Read permission to Allow, and set the Write permission to Allow.
- Click OK.
How to refresh a GPO immediately
While GPO changes are immediate, they are not immediately propagated to client computers. Propagation takes place when the following events occur:
- At computer startup.
- At user logon.
- When an application or a user requests a refresh.
- When the Group Policy refresh interval is enabled and has since passed.
Use the steps below to set a Group Policy refresh interval.
- Open the Group Policy Object Edtor for the GPO.
- Expand Computer Configuration, Administrative Templates, System, and then expand Group Policy.
- Double-click Group Policy Refresh Interval For Users in the details pane.
- Select the Enabled option.
- Set the appropriate refresh interval.
- Click OK.
When Group Policy settings in a GPO are changed, they are refreshed at five minute intervals on domain controllers, and at 90 minute intervals on servers and workstation, by default. Windows Server 2003 provides the Gpupdate command-line utility which can be used to immediately refresh a GPO.
Use the steps below to refresh a GPO immediately.
- Click Start, Run, and enter gpupdate in the Run dialog box. Click OK.
- A message is displayed stating that policy is being refreshed.
How to remove a GPO link
When you remove a GPO link from a site, domain, or OU; only that particular GPO link is removed. The associated GPO is not deleted. This means that the GPO is still stored in Active Directory.
Use the steps below to remove a GPO link from a site, domain, or OU, and not delete the GPO from Active Directory.
- To remove an existing GPO link from a site, click Start, Administrative Tool, and click Active Directory Sites And Services. To remove an existing GPO link from a domain or OU, click Start, Administrative Tool, and click Active Directory Users And Computers.
- Right-click the particular site, domain, or OU that you want to remove a GPO link from, and select Properties on the shortcut menu.
- When the Properties dialog box for the site, domain, or OU opens, click the Group Policy tab.
- Click the GPO that should be unlinked from the site, domain, or OU, and then click Delete.
- When the Delete dialog box opens, click Remove The Link From The List.
- Click OK.
How to permanently delete a GPO
When you delete a GPO, that particular GPO is permanently removed from Active Directory.
- To delete a GPO from a site, click Start, Administrative Tool, and click Active Directory Sites And Services. To delete a GPO from a domain or OU, click Start, Administrative Tool, and click Active Directory Users And Computers.
- Right-click the particular site, domain, or OU that you want to delete the GPO from, and select Properties on the shortcut menu.
- When the Properties dialog box for the site, domain, or OU opens, click the Group Policy tab.
- Click the GPO that should be deleted from the site, domain, or OU, and then click Delete.
- When the Delete dialog box opens, click Remove The Link And Delete The Group Policy Object Permanently.
- Click OK.
Best Practices for Implementing GPOs
A few best practices to consider when implementing GPOs are listed below:
- To keep GPO administration simple, use unique names for each GPO.
- You should not link a GPO to the same OU multiple times, link it only once.
- While it is possible to link an OU to a GPO that is located in a different domain, you should steer clear of this situation. The processing of GPOs is delayed if Group Policy has to be acquired from a different domain.
- Disable the Computer Configuration node or the User Configuration node when it only contains Group Policy settings set to the Not Configured option. This tends to speed up computer startup and user logon processing times.
- Steer clear of conflicting policies. While a lower OU GPO can override an OU GPO higher in the tree, to keep things simple, try to steer clear of configuring conflicting policies.
- You should also avoid setting the No Override option, and the Block Policy Inheritance option as far as possible. Having these settings enabled can complicate matters when you need to troubleshoot Group Policy.
- You should only use the loopback processing option if he desktop configuration has to remain constant, irrespective of the user logging on. Enabling the loopback processing option can also cause confusion when you need to troubleshoot Group Policy settings problems.
- You should also utilize WMI filters only when necessary. Having numerous WMI filters, increases user logon processing time.
- You should filter the scope of a GPO according to security group membership. This prevents other users, who do not need the GPO applied, from experiencing a logon delay.


Follow Us!