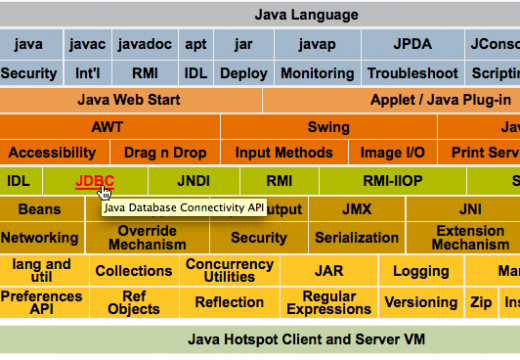
A Java Servlet is the Java technology used to extend and improve Web server functionality. Servlets are able to provide a platform independent way to build web-based applications founded upon components without the performance limitations found with comparable CGI applications. Since Java Servlets are platform and server independent, they can be deployed across the full range of web server technologies on the market and provide the full access to the Java programing language APIs to include JDBC for enterprise databases. Additionally, servlets are capable of accessing libraries of HTTP specific method calls and can leverage the reusability of previously developed Java components.
What is a Java Servlet?
A Java Servlet is most commonly used to provide dynamic content which may be the result of a database query, process and/or store information submitted via a web form, manage state information which does not natively exist in the HTTP protocol, and provide responses to other dynamic queries. For those who are more technically inclined, a Java Servlet is a Java EE class which meets the requirements specified in the Java Servlet API. The protocol defines the ways that a servlet will respond to external request delivered via any specified client/server protocol. In practice, servlets are most commonly associated with the HTTP protocol in order to respond to requests made via the Internet. Developers are able to use servlets to dynamically deliver HTML content or XML-based data. Today, servlets are also able to maintain session state through the use of URL rewriting or HTTP cookies.
At a more basic level, a servlet is a Java object that is capable of receiving requests and dynamically generating responses based on the input. In the basic Java Servlet package, objects are defined that include configuration parameters as well as the servlet execution environment in addition to objects that represent servlet responses and requests.
What is Required to Deploy a Servlet?
In order to deploy a servlet, a web or servlet container must be used. The container is the part or component of a web server that is responsible for all servlet interaction. It will also be responsible for servlet lifecycle management, ensuring the URL requester has the right access permissions, and mapping URL(s) to servlets. All permitted interactions between the servlet and associated web container are defined in the javax.servlet API package hierarchy.
Can Java Servlets be Automatically Generated?
Since Java servlets were first created, the ability to automatically generate a servlet has been included in Java Server Pages (JSP). When automatically generating a servlet, the Java Server Pages compiler is used to create the code to embed within an HMTL page. When a servlet is created manually, the HTML code for a page will typically be included inside of the Java source code.
Java Servlet History
The original Servlet specification was finalized in June of 1997 (version 1.0) by Sun Microsystems. The specification shifted to being developed under the Java Community Process with version 2.3 of the specification. Both the Servlet 2.3 and Java Server Page 1.2 specs are defined by JSR 53. JSR 154 would go on to define the Servlet 2.4 and 2.5 specs. In March of 2010, the 3.0 version of the Servlet specification was released and is one of the most deployed versions of the technology in industry at the time of this writing.
Servlet API Release History
Servlet API Release Date Platform Major Changes
Servlet 3.0 December 2009 JavaEE 6, JavaSE 6 Ease of development, Async Servlet, File Uploading, Security.
Servlet 2.5 September 2005 JavaEE 5, JavaSE 5 Requires JavaSE 5, supports annotation
Servlet 2.4 November 2003 J2EE 1.4, J2SE 1.3 web.xml makes use of XML Schema
Servlet 2.3 August 2001 J2EE 1.3, J2SE 1.2 Addition of Filter
Servlet 2.2 August 1999 J2EE 1.2, J2SE 1.2 Becomes part of J2EE, web applications in .war files introduced.
Servlet 2.1 November 1998 N/A First official specification, includes RequestDispatcher, ServletContext
Servlet 2.0 JDK 1.1 Included as part of Java Servlet Development Kit 2.0
Servlet 1.0 June 1997
What is the Java Servlet Life Cycle?
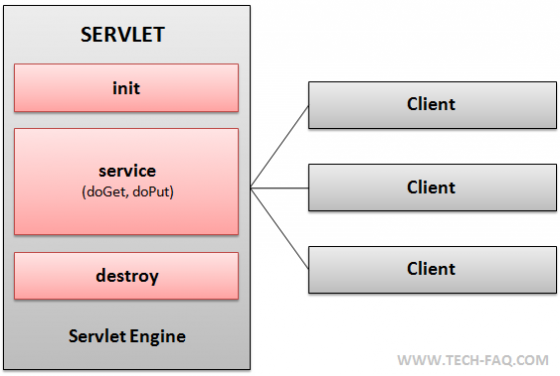
There are three methods core to the life cycle of a Java Servlet. They include init(), service(), and the destroy() methods. Each method is required to be implemented by any Java Servlet and has a specific time of invocation by the web server.

Servlet Initialization Stage
During the initialization stage of a servlet, the web container will call the init() method to initialize the servlet instance. On invocation, the container will pass a Java object that implements the javax.servlet.ServletConfig interface. The handle to the configuration object will allow the Servlet to access name-value initialization parameters from the web application using the Servlet.
The Service Stage
Once a Servlet is initialized, the instance is able to service client requests for the life of the Servlet. Each request is run or spun off in a separate thread from the primary Servlet process. The associated web container will invoke the service() method for each client request. The service method will ascertain what type of request has been made and send to the appropriate method for handling the request. When a Servlet is developed, it has to implement each of the service methods required in the interface definition. If a method is not defined, the defined method in the parent class is invoked which will normally result in an exception being thrown and error returned to the client making the request.
Destruction Stage
When a Servlet is taken out of service, the web container will invoke the destroy() method. Similar to the init() mehod, destroy() is only invoked a single time in a life cycle of servlet. When this method is invoked, all resources such as file handles are released, memory allocated to the service is garbage collected, and any data that must be saved to a persistent data store is saved.
Typical Servlet Life Cycle
A typical Java Servlet will notionally follow these steps:
Step 1 – A client or end user makes a request via a Web browser or service to visit a URL.
Step 2 – The web browser or service generates an HTTP request for the desired URL.
Step 3 – The HTTP request is forwarded or sent to the configured Web server.
Step 4 – The Web server receives the HTTP request and forwards on to the appropriate Servlet container.
Step 5 – The Servlet container maps the request to the appropriate Servlet.
Step 6 – The Java Servlet is dynamically retrieved and then loaded into the address space of the container.
Step 7 – The Web container initializes the Servlet by invoking the init() method.
Step 8 – Any required initialization parameters are passed to the Servlet on creation.
Step 9 – The Web container invokes the service() method of the Servlet to process the HTTP request.
Step 10 – The Servlet reads any information passed via the HTTP request and formulates an HTTP response for the requesting client.
Step 11 – The Servlet continues to persist in the Web container’s address space to process additional HTTP request from Web clients.
Step 12 – The service() method is invoked for subsequent HTTP requests. When invoked, the Servlet will spin off an additional thread to handle the request and required response.
Step 13 – Depending on the architecture of the Web container, the Servlet may be unloaded from memory. This decision is unique to each Web container’s design.
Step 14 – When the Servlet is unloaded, the Web container will invoke the Servlet’s destroy() method. This will release any resources such as file handles as well as save required data to a persistent store for the Servlet.
Step 15 – Memory allocated to the Servlet and any Java objects created during its invocation and use will be released and garbage collected.
Advantages of Java Servlet
- Portability is a major advantage. A Servlet can be deployed across platforms using the Java Virtual Machine.
- Java Servlet helps make a dynamic web application, using the vast set of Java APIs.
- Because Java doesn’t support the concept of pointers, building a Java Servlet gives more security than other counterpart technologies.
- A Java Servlet can handle other operations on the server too – like logging, scheduling, etc.
- Using the concept of Threading, a Java Servlet executes in a much lesser time frame.
How to Run a Java Servlet
If a developer is new to creating and running Java Servlets, setting up a basic development environment is the necessary first step in learning the Servlet API. The following steps outline how to setup a basic environment on a development computer for running a Java Servlet.
Step 1 – Download and install the Apache Tomcat server on the development computer. Apache is available for use on a number of operating systems, so select the appropriate build for the development computer.
Step 2 – Configure the path for the Servlet JA file included in the Apache Tomcat download on the target computer. On a Windows computer, select the “Control Panel” program icon from the Windows “Start” menu. Then, select the “System” and “Advanced” menu options followed by clicking the “Environmental Variables” menu choice. Click the “New Button” menu option and input “CLASSPATH” for the variable label or name. Next, input the location of the servlet APIL JAR file. The entry will look similar to:
“c:\Program Files\Java\Tomcat 6.x\lib\servlet-api.jar”
With the specific Tomcat build being entered in the place of where “Tomcat 6.x” appears.
Step 3 – Move or copy the associated web.xml and compiled class file for the Java Servlet you want to run into the “webapps” folder located in the Tomcat server directory path.
Step 4 – Launch the Tomcat server by double clicking the “Startup.exe” file that is located in the “bin” directory of the Tomcat installation.
Step 5 – Launch the Web browser on your computer.
Step 6 – Enter the following URL into the browser’s address bar: “http://localhost:8080/TechFAQTestServlet”
The name of the servlet will need to match the name of the Servlet you are testing.
Step 7 – The Servlet will now load in the local web browser and allow the end user to interact or test the Servlet.
How Do You Open a Word Document from a Java Servlet Response?
Java Servlets are capable of conducting a wide variety of operations. One common application for Servlets designed to interface with Microsoft Office related products is the ability open, create, edit, and delete a Word document. The following steps outline how to open a Word document via Java Servlet response.
Step 1 – Within the Java Servlet code, create a Java output stream variable. This variable will be used to send a Word document to the requesting client and open it within the code. For example:
ServletOutputStream myOutput = res.getOutputStream();
Step 2 – Configure or set the MIME type of the output stream. This will ensure the output stream will know to expect to receive an output stream type of a MS Word document. For example:
res.setContentType( “application /msword” );
Step 3 – Configure the document to open. The following example will open the Microsoft Word document that will eventually be displayed to the requesting client:
res.setHeader(“Content-disposition”,”attachment;filename=techFAQ.doc”);
Step 4 – Send the Microsoft Word output file to the requesting client’s window. In order to accomplish this function, the “URL” class is used to configure the output to the specified Word document.
URL myUrl = new URL (res);
myUrl.OpenStream();
How to Initialize a Servlet
Java Servlets serve as the core of most Java-based web applications. Even if a developer is solely using JavaServer pages for development, Servlets are still at the core of the operation. Many times, advanced Java Servlet development will require various resources or logic be executed during the first loading or initializing of a Servlet during the Servlet life cycle.
Step 1 – Open the Java Servlet development code in your integrated development environment (IDE).
Step 2 – Add the Servlet initialization code to the Servlet by defining the init() method. This will override the default init() method in the HttpServlet class. For example:
public class TechFAQServlet extends HttpServlet {
public void init() {
System.out.println(“The TechFAQ Servlet is being initialized !”);
} }
Step 3 – Alternatively, modify the associated web.xml file with the Servlet to indicate that the Servlet requires initialization on startup. If this step is not accomplished, the Servlet will be initialized on the first load via HTTP request. For example,
<servlet>
<servlet-name>TechFAQServlet</servlet-name>
<servlet-class>com.servletExample.TechFAQServlet</servlet-class>
<load-on-startup>1</load-on-startup>
</servlet>
Step 4 – Compile and build the project from within the Java IDE.
Step 5 – Redeploy the application to the Web application container.
Step 6 – Launch the Servlet in the local or online web browser to see the desired changes during Java Servlet initialization. If you are using a locally deployed web browser, you may have to restart the web browser after saving the new project to the server’s directory path.


Follow Us!