Java was originally developed as an implementation of a programming language that would compile and complete its directive functions regardless of platform and language version. It was developed by James Gosling, a software developer employed by Sun Microsystems in June of 1991, whom released the first version of Java in 1995.
The language is designed to allow programmers to write the code once and have it work in any Java Virtual Machine. The ability to do so has made this programming language extremely versatile, productive, and easy to use, and has helped to make computers and the internet more interactive.
Gosling’s main goals in developing the Java language were: implementing object oriented programming methodology containing built in support for the use of computer networks, the ability to execute remote sources of code in a secure fashion, and of course cross platform compatibility.
The following list of ideals for Java has stuck ever since it was created in 1995:
- Simple, Object oriented, and Familiar
- Robust and Secure
- Architecture Neutral and Portable
- High Performance Execution
- Interpreted, Threaded, and Dynamic
The history behind the naming of this programming language is a bit drab. Searching for a suitable name, James Gosling originally titled his language “Oak”, after a tall oak tree that cast shade into his office. Eventually, “Oak” became “Green”, and then “Java” was chosen from a list of random words that had been compiled.
The most appealing feature of Java is indubitably its platform independence, which means that any snippet of Java code, when compiled, will run in a similar fashion on any of the supported platforms. A programmer should be able to write a program one time, compile it one time, and then be able to execute it anywhere; holding true to the Sun Microsystems slogan, “Write Once, Run Anywhere.”
The downside to Java is that it is a bloated language (causing long buffer times), while still being simple and feature suppressed, leaving many programmers and users irate.
What is Java Used For?
Java is used in many facets, from the digital displays on your microwaves and refrigerators in your kitchen to the digital displays on your telephones, fax machines, and copiers in your office. It is used on the web (via applets) for entertainment, research, and other miscellaneous functions, like a website spell checker that will automatically go through your website, click each link, and spell check every page. Here are some examples of how Java is being used.
Internet Java Applications
Java applets are special code which is designed to be embedded within a Web page to run an application in your web browser. Java applets are used to allow chat functionality, performing mathematical calculations, and a whole host of other functions. Java is a very sturdy Language which makes it possible to even make online games feasible without the use of large amounts of resources.
Java Applications on Your Computer
The Java language is very simple to learn and use to create spectacular applications which could run locally on your computer. This is possible on nearly every computer due to the programming language itself. Since most operating systems have a version of the Java Virtual Machine ported to them, java applications have the ability to function regardless of the end user’s computer environment. This means that someone with a Windows machine can run the same Java programs on an Apple machine and even on a Unix/Linux machine as well.
Mobile Phones – Mobile phones are large targets for Java applications because it offers easy integration and can run with limited resources. Games, useful programs and other functioning applets are available for mobile phones. The advantages of these applications are that they take up little space and can run on any phone which has Java capabilities.
Amazon Kindle – The Kindle makes use of Java in its integral structure. Java controls all of the functions and makes the e-ink possible on the device. Integration to the whisper net of Amazon allows instant download of contents onto the device no matter where you are. It has the capability to store over 200 books and reading materials which would be available at your fingertips.
Livescribe Writing Tool – The Livescribe pen is a very unique device which allows you to write on special paper with a pen that records everything you do with Java. Special applications can be installed onto the pen such as games, sound recording applications and so much more. These devices are the future of manual writing utensils.
Sentilla Computer Free Computing – This is a revolutionary use of Java. A microchip fitted with microcontrollers which perform Java functions controlled by several input device options. This could be motion control, weather changes, light sensitivity and basically anything that can be measured with a small java application that runs on the device. It has a multitude of applications in security systems, military projects and many other things.
Bluray Disc – The Bluray disc is very useful for many reasons. It can hold immense amounts of data, store movies and images and now video games for gaming platforms such as the Sony Playstation 3. With Java, it can run games and applications on generic Bluray disc players. This is very unique and offers a large market in gaming to those who only have Bluray disc players apart from the gaming consoles.
Printers – Special printers are now available which use Java directly within their on board programming. This offers a wide range of functions that were never available on printers before and can be used even without a connection to a computer. These printers can accept image data from many types of media and have image processing software on board.

The Installation of Java on Your Machine
To use Java on your computer, it must be installed before it is available. Some computers have Java preinstalled if it has software that requires the Java Virtual Machine. The easy way to check if it is already on your machine is to visit the official Java website which has the installer available for free. The resulting installation file will allow you to install the newest version of the Java Virtual Machine for your computer and web browsers. You will need to manually uninstall the older version of the software if your computer was outfitted with the latest version of the Java Virtual Machine.
The Differences between Java and JavaScript
Although the two programming languages of Java and JavaScript sound very similar, they are not the same thing. JavaScript is a programming language that was designed for easier use within web browsers only. The Java programming language makes it possible to write stand alone applications which could be used outside of the web browser environment. JavaScript is more of a watered down version of Java which is intended to only perform a handful of functions. Java is more versatile and can be used for serious programming projects.
J2SE
J2SE (Java 2 Standard Edition) is the development and deployment platform for the Java programming language. Originally created and developed by Sun Microsystems, J2SE defines a large number of general purpose API’s for the Java Class Library as well as the Java Language and Virtual Machine Specifications. The Oracle Corporation’s Java Development Kit, or JDK, is one of the most downloaded and known implementations of J2SE. Beginning with Java SE 6, Oracle removed the “2” label from the branding of the project, instead referring to subsequent versions as simply “Java SE.”
Java Version History
There have been a significant number of changes made to the Java programming language since the release of JDK 1.0. There have been additions to just about every aspect of the language to improve functionality, security, and portability with modifications / additions made to both classes and packages included in the language’s standard library. Starting with J2SE 1.4, the subsequent versions of the Java programming language have fallen under the JCP (Java Community Process) that makes use of JSRs( Java Specification Requests) for proposals of changes or new additions to the Java platform. The overall specification of the language is now governed by the Java Language Specification (JLS) which are managed under the authority granted under JSR 901.
Over time, the Java class library has expanded from just a few hundred classes that existed in JDK 1.0 to more than 3,000 included in J2SE 5. Over the development history of Java, there has also been a number of new APIs added to the programming language such as Java2D and Swing. A number of the original classes and methods within classes have been deprecated since the first release of JDK 1.0.
Beginning with J2SE 1.2 through 1.5, the Java SE was officially branded or labeled as the Java 2 Platform, Standard Edition, or J2SE. The “SE” label is used to help distinguish the build from the Micro (ME) and Enterprise Editions (EE) of the programming language. Since J2SE 1.4, code-named Merlin, Java SE development has fallen under the Java Community Process.
Java Release Timeline (Major Versions)
JDK Alpha and Beta (1995)
JDK 1.0 (January 23, 1996)
JDK 1.1 (February 19, 1997)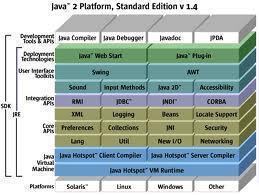
J2SE 1.2 (December 8, 1998)
J2SE 1.3 (May 8, 2000)
J2SE 1.4 (February 6, 2002)
J2SE 5.0 (September 30, 2004)
Java SE 6 (December 11, 2006)
Java SE 7 (July 28, 2011)
Java SE 8 (est in March 2014)
Java SE 9 (est 2016 release)
Java SE 9 is forecast for release by Oracle in 2016. This version of the programming language is expected to include improved native code integration, support for multi-gigabyte heaps, as well as a self-tuning JVM. There are also plans in the works for automatic parallelization using OpenCL, but this could move to Java SE 10.
Java SE 10 (Release TBD)
There is not a release date set for JSE10 yet; however, one of the major features being discussed by Oracle is removing primitive data types and to include support for 64 bit addressing.
J2SE Features
J2SE 1.5, or J2SE 5.0 (code named Tiger), is the last update of Java to include the Java 2 branding label. Specific features included in this version include better portability support, JDBC API for database access, CORBA technology, and Java security. The two primary components of J2SE include Core Java and Desktop Java. The Core Java component includes the back-end functionality for the programming language, while Desktop Java includes the graphical user interface (GUI) functionality for the programming language. J2SE is designed to provide developers a means to rapidly develop and deploy portable applications capable of running on most operating systems in a secure environment on both servers and computer desktops.
Additionally features included with the J2SE 5.0 build included new updates to the programming language. These included support for metadata, generics, enumerated types, and autoboxing of primitive types. The build also included improved “out-of-box” performance for Java, new JVM monitoring and management APIs, and a new default look and feel for the language.
How Do You Install J2SE?
The typical download size of J2SE is approximately 10 MB and is supported on a number of computer operating systems.
Step 1 – Login to your computer with an account that has permission (s) to install new software. This typically requires the account to have administrator access to make modifications on the computer system.
Step 2 – Launch the computer’s web browser and load the Oracle Java installation web page.
Step 3 – Select the J2SE version that you want to install on the computer. For most computer users this will be the most recent build of Java SE; however, Java 5.0 / 1.5 should be chosen if you want the most recent version of J2SE that was released before changing the branding of the programming language builds.
Step 4 – If the download of J2SE fails, disable your computer’s Internet firewall and attempt to download the Java installer again. Some firewall application configurations will prevent the satisfactory download and installation of J2SE.
Step 5 – Once the J2SE installation file has been saved to your computer’s desktop, double-click the application icon to start the installation process.
Step 6 – Select the “Install” menu button to accept the license terms of J2SE.
Step 7 – Accept the default menu options for the installation application. Some versions of J2SE will offer downloads by Oracle partners while installing Java. If you do not desire to install these applications, de-select the options during the install process, and select the “Next” menu button to continue installing Java.
Step 8 – After J2SE installation has completed, restart your computer to finish the install process.
What is the Java Virtual Machine?
The Java virtual machine (JVM) is the program responsible for executing applications that include Java bytecode. The most common implementation of a JVM is to execute Java bytecode on a specific computer operating system; however, they can also be implemented to be embedded directly in different hardware implementations. The JVM is responsible for providing the Java runtime environment that includes providing root-cause debugging and exception handling. JVMs are distributed with a Java Class Library to include the Java standard class libraries which are responsible for implementing the Java API. The libraries combined with the JVM make up the JRE.
Since JVMs are created for a number of software and hardware platforms, they allow the use of the same Java bytecode for all supported platforms. This feature allows the Java programming language to be compiled once and run anywhere that Java is supported. As a result, the JVM is one of the most critical components of the Java programming language. As the language has matured, other programming languages such as Ada have included support for compilation to Java bytecode to take advantage of the JVM.
At the time of this writing, the most widely implemented JVM is produced by the Oracle Corporation who owns the Java trademark. Codenamed, Hotspot, the Oracle implementation of the JVM is written in the C++ programming language. Oracle allows JVMs to be implemented by other companies and to include the Java logo as long as they adhere to JVM specification. All JVMs include instructions for the following tasks: arithmetic, type conversion, load and store, object creation and manipulation, operand stack management, control transfer, throwing exceptions, method invocation and return, and monitor-based concurrency.
What is the Java Heap?
The Java heap, or the Java virtual machine heap, is the memory used by the Java Virtual Machine for dynamically allocating memory. The HotSpot implementation of the JVM is split or divided into generations. The young generation is responsible for storing objects that are short-lived. These objects are created and almost immediately garbage collected. If a Java object will persist, it is moved to the old generation of the heap, or the “tenured” generation.” Class definitions and associated metadata are placed in the permanent generation and are not considered part of the Java heap. This is a change from the original implementation of the Java heap to improve performance since Java class unloading occurs less frequency than garbage collection of Java objects.
How Does the JRE Work?
The execution environment for Java is called the JRE or the Java Runtime Environment. If a program is written in Java to run on the Java Virtual Machine (JVM) it first must be compiled into Java bytecode that is saved in a .class file. The bytecode is a standardized binary format that be combined with a number of other class files in a single .jar file archive (similar to a zip file). The JVM runtime environment is designed to execute these .jar or single .class files through the use of a just-in-time compiler (JIT). TO achieve improved speed advantages, JIT compiling is used in the majority of JVMs released into the field today. There are also “ahead-of-time” compilers now available which allow code writers to precompile class files into native code for specific applications and deployment platforms. Similar to other virtual machines, the Java Runtime Environment uses a stack-based architecture similar to a microprocessor. The JRE includes lower-level support for Java-like classes with the most popular implementation being deployed by Oracle named “Hotspot.”
How to Remove Old Versions of the Java Runtime Environment
Depending on how old your computer is, you may have several older versions of the Java Runtime Environment (JRE) installed on the machine which no longer have any use. Oracle recommends running the most recent version of the JRE on one’s computer to ensure the most recent performance and security updates are installed. A common problem that arises for computer users is removing older or legacy versions of the JRE from the target computer.
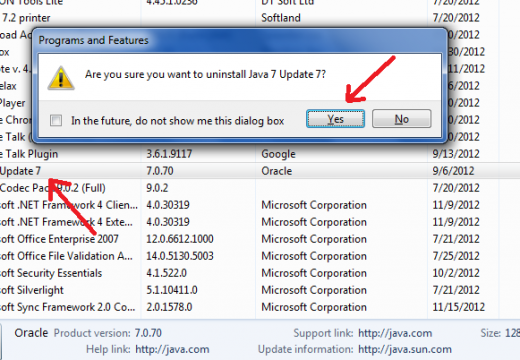
Step 1 – Select or click the “Start” button and then choose the “Control Panel” icon. On older versions of the Windows OS, you may have to select the “Settings” menu button in order to see the “Control Panel” menu option.
Step 2 – Select and click, or double-click the “Programs and Features” menu icon on Windows 7 or Windows Vista builds.
Step 3 – Double-click the “Add/Remove Programs” menu option.
Step 4 – Find the “Java” menu label in the program listing for the computer.
Step 5 – Single-click the “Java” icon and choose the “Remove” or “Uninstall” menu button. Accept the default menu prompts as they are displayed.
Step 6 – After the uninstall process concludes, restart your computer to complete removing the old version of the JRE.
Step 7 – Repeat the uninstall process for all legacy versions of the JRE installed on your computer.
How to Verify the Version of Java Installed on a Computer
Step 1 – Launch your computer’s web browser.
Step 2 – Load the Oracle Java verification web page.
Step 3 – Accept the security warning displayed in your computer’s browser (if one is presented to you).
Step 4 – Click the “Run” menu button on the signature verification page if the installed version of Java on the computer passes the Oracle signature verification test.
Step 5 – View the results displayed on the Oracle web page. If your computer does not have the most current version of Java installed, the recommended version of Java will be displayed along with a download link to install this version.
Step 6 – Click the “Download Now” menu button to proceed with installing the recommended version of Java.
Step 7 – Click the “Agree and Start Free Download” menu option after reviewing the Oracle end-user license agreement.
Step 8 – After download of the Java installer has concluded, double-click the installation file that has been saved to your computer.
Step 9 – Accept the default menu prompts of the installer and then click the “Install” menu button.
Step 10 – Depending on the version of OS installed on your computer, you may need to restart your web browser or the entire computer to finish upgrading the version of Java installed.
Step 11 – Alternatively, the Java version can be retrieved via the DOS command prompt on Windows computers and terminal on non-Windows operating systems. To do this, first open the appropriate prompt on your computer.
Step 12 – Once the DOS prompt or terminal is launched, enter the command, “Java – version” without the quotations followed by pressing the “Enter” or “Return” key on the computer’s keyboard.
Step 13 – View the resulting output that will include the specific Java SE version and build installed on the computer.
J2EE
J2EE is the Java 2 Platform Enterprise Edition computing platform produced by the Oracle Corporation. Starting with Java EE 5, Oracle dropped the “2” descriptor from the platform, although many developers still refer to it as J2EE. Regardless, the platform continues to provide both an API and runtime environment for developers to create and run enterprise software. Features include support for web and network services in addition to large-scale, reliable, multi-tiered, and secure network-capable apps. J2EE is an extension of J2SE or JSE (Java Platform, Standard Edition), and gives developers APIs that make object-relational mapping, web services, and distributed or multi-tier architectures possible to develop. The entire platform relies on modular components which are running on an application server and support for using XML to override annotations and/or J2EE defaults is permitted.
J2EE Version History
The Java 2 Platform, Enterprise Edition, J2EE, was first released on December 12th, 199. With the release of Java EE 5 in May of 2006, Oracle officially changed the name of the platform to Java Platform, Enterprise Edition. At the time of this writing, the most current build of the project is Java EE 7.
J2EE 1.2 (December 12, 1999)
J2EE 1.3 (September 24, 2001)
J2EE 1.4 (November 11, 2003)
Java EE 5 (May 11, 2006)
Java EE 6 (Dec 10, 2009)
Java EE 7 (June 12, 2013)
Overview of Java Enterprise Applications
J2EE was originally created to allow developers to create and make large-scale, secure, multi-tiered, reliable, and scalable applications. Short-code for this type of program is the term, “enterprise application.” This comes from the point of view that most of these projects are created to help solve issues or problems encountered by very large  companies or enterprises! Although originally created for large entities, many of the Enterprise application solutions have proved helpful for smalltime developers and organizations in the connected world of today. With the number of advanced features found in Enterprise applications, the complexity of the programs can be immense. As a result, the J2EE and now JEE platform is tailored to help program architects reduce the manage complexity of these applications. This is accomplished through providing an API, development model, and runtime environment which allows additional focus to be placed on program functionality.
How Do Tiered Applications Work?
In J2EE multi-tiered applications, the functionality of the program is split into different functional sections or areas which are referred to as tiers. The classic architecture for this type of application includes a data tier (also referred to as the enterprise information systems tier), middle tier, and client tier. The middle tier is responsible for handling client request sand processing data from applications, the data tier stores information in the data store, and the client tier contains the client program responsible for making requests to the middle tier.
How Does the J2EE Client Tier Work?
The J2EE client tier contains application client(s) which are able to access a Java EE server located on a different computer or server. The clients are responsible for making service requests to the server which then processes these requests and returns a response to the applicable client computer. There are a number of programs that can be Java EE clients and they are not required to be Java applications. For example, a Java EE client can be a stand-alone program, a web browser, or other web server.
The J2EE Web Tier
The J2EE web tier contains all of the application components that are responsible for coordinating the transactions or interactions between the clients and J2EE business tier. The primary tasking for the web tier include: 1 – Saving and maintaining the user’s state of data for single sessions, 2 – Conducting basic logic operations and temporarily storing information in JavaBeans components, 3 – The dynamic creation of content in various formats for client computers, 4 – Taking input from the client interface and returning the desired results from business tier components, and 5 – Controlling the flow of pages or screens on the client machine.
J2EE Technologies on the Web Tier
The J2EE or JEE Web Tier includes a number of technologies that can be leveraged by developers. These include Java Servlets, JavaServer Faces technology, Java Server Pages, and JavaBeans. Servlet technology allows developers to use Java programming language classes that are able to process requests and send responses for HTML pages. JavaServer Faces is the user-interface framework for web applications. The technology allows developers to include user interface (UI) components on a web page, save data to server-side data stores, and keep track of the component state. JavaServer Faces Facelets are a relatively new option that are designed to leverage XHTML pages instead of JSP pages. JSP (Java Server Pages) are the text-based documents that are ultimately compiled into servlets and help define how dynamic content will be added to static HTML pages in J2EE. Finally, JavaBeans components are Java objects that will act as data stores for application pages in a temporary fashion.
The J2EE Business Tier
The J2EE or JEE business tier includes development components that are designed to provide the business logic for the application. When an application is designed properly, the core functionality will reside primarily in this tier. Some of the Java EE technologies that are used in this tier of JEE include Enterprise JavaBeans components, JAX-RS RESTful web services, JAS-WS web service endpoints (SOAP), and JAVA EE Managed Beans. Java EE Managed Beans are different than Enterprise Beans in that they do not require the security or transactional features required by those which are exposed to the wild.
How Does the Enterprise Information Systems Tier Work?
The J2EE enterprise information systems (EIS) tier includes enterprise resource planning systems, database servers, and legacy data sources. These resources will normally reside on a different computer or server than the primary Java EE server and provide access to components located on the business tier. Technologies included in this tier include JDBC, the Java Persistence API, the Java EE Connector Architecture, and the JTA (Java Transaction Architecture).
JDBC is the JEE or J2EE low-level API designed to support for retrieving and accessing information from data stores in the application. One of the most common uses of JDBC is to conduct SQL operations on a given database. The Java Persistence API is used for accessing information located in data stores and then mapping that information to Java objects. The API works at a higher level than JDBC and helps to hide some of the complexity associated with database operations. The J2EE Connector Architecture is an API created for helping to connect to other enterprise resources. Finally the Java Transaction API, or JTA, is used to manage and define transactions that can cross one or many data sources.
What is a J2EE Server?
A J2EE or Java EE server is a program or application created to implement the J2EE platform services and API. These servers are commonly referred to as application servers since they let the developer send or serve application information to client computers. This action is similar to web servers that are designed to serve or send web pages to Internet browsers that request the content. One major difference; however, is that J2EE servers are able to host a number of application component types. Each of these can correspond to the applicable tier in a J2EE multi-tiered program. The J2EE server is responsible for providing servicing to all of these components using a Java EE container.
What is a Java EE Container?
A J2EE or Java EE container is the primary interface between the Java component and the low-level functionality provided by JEE to support the defined component of the application. The container functionality is further defined by the platform and can vary or be different for every component type. As a result, the server will allow the differing components to work with each other in order to give the functionality expected from enterprise applications.
Java EE Web Containers
The J2EE web container is defined to be the primary interface between the web server and web components. This role can be filled by a JSP, JavaServer Faces Facelets, or servlet page. The container will be responsible for managing requests to other application components, the component’s life cycle, and helps provide an interface to context information.
What is the Application Client Container?
The J2EE application client contain is responsible for being the primary interface between J2EE application clients and the J2EE server. The application container will be loaded an ran on the client computer. It will then act in a gateway role between the client application and the J2EE server components used by the client.
How Does the EJB Container Work?
The EJB container is designed to be the primary interface between Java enterprise beans and the Java EE server. While the beans are responsible for providing the business logic in the EE program, the EJB container will execute on the J2EE server and manage execution of all of the program’s enterprise beans.
How to Install J2EE
Step 1 – Launch or open your computer’s web browser.
Step 2 – Open the Oracle J2EE (JEE) installation page in the web browser.
Step 3 – Select the appropriate installation for the OS of your computer and select the “Continue” menu button.
Step 4 – Save the installation file on your computer’s desktop when asked if you would like to save the file. The download will now start downloading to your computer.
Step 5 – Double-click the newly downloaded J2EE installation file after it has finished downloading on your computer.
Step 6 – Select the “OK” menu button and the “Run” button when prompted to do so by the Java installer.
Step 7 – Choose the “Next” menu button when the J2EE or JEE installation wizard launches.
Step 8 – Select the “Yes” menu button to agree with the Oracle license agreement followed by choosing the “Next” menu button. Oracle will not allow the software to be installed without agreeing to the license agreement.
Step 9 – Choose the “Next” menu button when provided with the installation path and directory on your computer.
Step 10 – If queried, input a username and password for the installation.
Step 11 – Accept the default installation options if installing for the first time on your computer followed by clicking the “Next” menu button.
Step 12– Choose the “Install Now” menu option to continue to the primary installation step of JEE or J2EE.
Step 13 – Select the “Finish” menu button when the installer has completed operations.
Step 14 – Depending on the version of Windows installed on your computer, you may have to restart the machine to complete installation of J2EE or JEE.
What is NetBeans?
NetBeans is an IDE capable of supporting Java development as well as other languages such as C/C++, PHP, and HTML 5. It can also be used as an application platform framework for Java applications and is capable of running on Mac OS X, Linus, Solaris, and other operating systems that support the Java Virtual Machine. The Netbeans Platform is designed to allow programs to be created from modular software components that are referred to as modules. Applications based on this platform can further be extended by third party developers to aid in rapid application development.
The NetBeans IDE Bundle for Web and JEE provides an IDE that supports enterprise development with the Java programming language and others to include HTML 5, PHP, and C/C++. The IDE is updated to support the latest Java EE standards and includes Apache Tomcat and GlassFish. The latest release of the IDE (at the time of this writing) includes support for Bean validation, improved Java Persistence, CDI, and Rest services support, new support for JSF component libraries, and an improved editor.
How to Install NetBeans on Solaris and Linux
The NetBeans installer for Solaris and Linux platforms lets the end-user choose from either a binary installer or archive distribution for the installation.
Step 1 – Download the desired J2EE or JEE installation file to your computer.
Step 2 – Open a command prompt on the target computer.
Step 3 – Navigate to the directory that you downloaded the installation file.
Step 4 – Change the permissions of the file to allow it to be executable by typing the following command at the command prompt: $ chmod +x NetBeansFileNameHere.bin
*Note: “NetBeansFileNameHere” should be replaced by the filename of the actual installation file you downloaded to the computer.
Step 5 – Launch the NetBeans installer by typing the following command at the command prompt:
$ ./ NetBeansFileNameHere.bin
Step 6 – If you have multiple J2SDK’s installed on your computer, you can speed up the installation process by specifying the J2SDK for NetBeans to use through invoking the following command:
$ ./ NetBeansFileNameHere.bin -is:javahome path_to_your_jdk
to complete the installation process.
How to Install NetBeans on UNIX
Step 1 – Download the NetBeans installation file to your computer. For UNIX installations, this will likely be in a .tar or .tar.gz format.
Step 2 – Open the command prompt on your computer and change to the directory that includes the NetBeans archive file.
Step 3 – Untar or unzip the installation file using one of the following commands:
$ gzip -d NetBeansFileNameHere.tar.gz
$ tar xf NetBeansFileNameHere.tar
*Note: If you are on a Solaris machine, you will want to use the GNU tar command for tar.gz files to ensure the entire archive file is unpacked.
Step 4 – Launch the NetBeans IDE by changing directories to the bin subdirectory of the installation. Then, run the runide.sh launcher script.
How to Install Netbeans on Windows
Step 1 – Download the installation file for NetBeans on your computer.
Step 2 – Double-click the installation file to start the NetBeans installation wixard.
Step 3 – Choose the J2SDK for the IDE to use, the directory to install the NetBeans IDE, and whether or not you desire to associate .java and .nbm (NetBeans modules) files with the NetBeans IDE.
Step 4 – Accept any default menu prompts the installer presents you with from this point forward.
Step 5 – Restart your computer after the installation concludes.
Step 6 – Launch the NetBeans IDE by double-clicking the IDE icon located on your computer’s desktop after installation is complete.
How to Install Netbeans on Mac OS X
Step 1 – Download the installation file for the NetBeans IDE to your Mac OS X computer. This will be in a .dmg format.
Step 2 – Double-click the .dmg file to mount the file in the computer’s file system.
Step 3 – Run the NetBeans Launcher application to run the NetBeans IDE.
Step 4 – Alternatively, you can open the Terminal application on your computer and change directories to where you would like the NetBeans IDE to be installed.
Step 5 – Then, enter the following command at the command line:
gnutar -xvzf netbeansFileNameHere.tar.gz
Step 6 – Launch the NetBeans IDE by changing directories to the bin subdirectory of the installation. Then run the runide.sh launcher script.


Follow Us!