The JDK (Java Development Kit) most commonly refers to an implementation of the Java SE or Java 2 SE. It can also refer to Java EE or Java ME implementations released by Oracle in the form of binary products targeted to Java developers that work on the Windows, Mac OS X, Linux, or Solaris platforms. The JDK has been one of the most downloaded and used development platforms since the release of the Java development platform. Sun Microsystems released the JDK on May 8th, 2007 under the GPL (GNU General Public License) making it free to use software. At the time of the announcement, Sun contributed the source code of the project to OpenJDK.
What Does the JDK Include?
The JDK is now maintained by the Oracle Corporation. It is licensed under the GPL and is free for developers to use. It contains an all-inclusive development environment targeted towards Java developers. The JDK includes a Java Runtime Environment (JRE) that is designed to run on the operating system of the development computer as well as a number of programming tools. These tools include the requisite applications to program, code, compile, debug, and test programs.
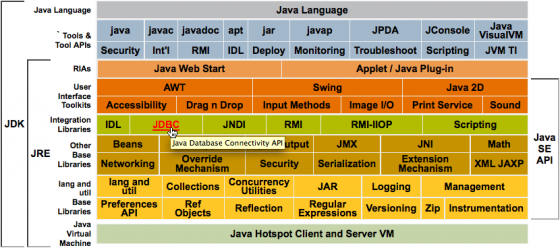
The primary components of the JDK include: 1 – Java API Classes, 2 – Java Compiler, and 3 – The Java Virtual Machine (JVM). The Java Compiler is used to compile Java source code into byte code which can be run on the JVM. Some of the additional programming tools that are included with the JDK include: Java Web Start Launcher, Java Debugger, Java Monitoring and Management Console, Java Heap Analysis Tool, JAR Archiver, Annotation Processing Tool, IDL to Java Compiler, Java Command Line Script Shell, and the JAR Compression Tool. Additionally, most JDK builds include programming code examples to aid programmers with developing Java applications.
Java Version History
Since the release of JDK 1.0, there have been a large number of changes made to the Java programming language. Just about every aspect of the Java programming language have undergone significant change since the 1.0 release. These modifications have included changes to help improve the security, functionality, and portability of the language. There have been modifications made to both the Java packages and classes in the Java standard library.
The Java Community Process (JCP) became the governing body for improvements to the programming language starting with J2SE 1.4. The JCP incorporates Java Specification Requests (JSRs) for additions or changes to the Java platform. The Java specification is guided by the JLS (Java Language Specification) that is managed under authority granted by JSR 901.
When JDK 1.0 was first released, the Java class library only included a few hundred Java classes. This has increased over the years to more than 3,000 that were included in J2SE 5 and newer releases of the language. Additionally, there have been a wide number of API’s added to Java since the first release. These include Java 2D, Java Swing, and others.
The following is the Java release timeline for major versions of the programming language.
Java Release Timeline History
JDK Alpha and Beta (1995)
JDK 1.0 (January 23, 1996)
JDK 1.1 (February 19, 1997)
J2SE 1.2 (December 8, 1998)
J2SE 1.3 (May 8, 2000)
J2SE 1.4 (February 6, 2002)
J2SE 5.0 (September 30, 2004)
Java SE 6 (December 11, 2006)
Java SE 7 (July 28, 2011)
Java SE 8 (est in March 2014)
Java SE 9 (est 2016 release)
*Forecast to be released by Oracle in 2016. Java SE 9 will include a number of improvements to include support for multi-gigabyte heaps, improved native code integration, as well as a self-tuning JVM features. Java SE 9 may also include automatic parallelization using OpenCL; however, this feature could move to Java SE 10.
Java SE 10 (Release TBD)
* Oracle has not set a release date for JS10. One of the primary features for the release include providing support for 64 bit addressing.
JDK System Requirements
In addition to the disk space required for the JDK installed image, it also requires sufficient disk space for Java Updates. The following are the requirements for the disk space requirements for both the JDK and the associated JRE on a Windows computer:
JRE (including JavaFX Runtime) – 124 MB
Java Updates – 2 MB
JDK Development Tools to include JavaFX SDK – 245 MB
JDK Source Code – 27 MB
For a 32 Bit operating system, Java requires a minimum of 128 MB of RAM for versions of Windows newer than Windows XP. Windows XP only requires 64 MB of RAM. All 64 bit installations of Java require a minimum of 128 MB of ram to run.
How to Install the JDK?
The easiest way to install the JDK on any supported operating system is to run the self-installing executable file and install the JDK. Most JDK builds will also include an option to install the latest JRE (Java Runtime Environment) on your computer as well. The JDK will include a private JRE for use by its tools; however, this will not improve the functionality of the client computer.
Step 1 – Open your computer’s web browser.
Step 2 – Download the JDK installer application for your computer’s operating system.
Step 3 – After the installer application file is downloaded to your computer, double-check that the byte size of the downloaded file is the same size as indicated on the Oracle download page. This will help ensure that you have downloaded an uncorrupted version of the installation file.
Step 4 – Ensure you are logged in to the Windows computer with an account that has administrator permissions.
Step 5 – Double-click the installation file on your computer and follow the default menu prompts displayed by the application.
Step 6 – Restart your computer if prompted to do so by the JDK installer.
Step 7 – Delete the installer file after the computer restarts to recover hard drive space.
JDK Silent Installation Options
Another option to install the JDK is to conduct a silent, non-interactive installation of the development kit using the command-line.
Step 1 – Launch the command prompt on your computer. On a Windows PC, select the “Start” button and enter “cmd” in the search text box followed by pressing the “enter” key. Then, change to the directory that you have saved the installation file on the computer.
Step 2 – In order to install the public JRE in silent mode, enter:
Jdk.exe / s
Step 3 – To install development tools and the source code but not the public JRE, enter the following command:
jdk.exe /s ADDLOCAL=”ToolsFeature,SourceFeature”
Step 4 – To install source code, development tools, and the public JRE, enter the following command:
jdk.exe /s ADDLOCAL=”ToolsFeature,SourceFeature,PublicjreFeature”
Step 5 – To install the public JRE in a specified directory, enter the following command:
jdk.exe /s /INSTALLDIRPUBJRE=C:techfaq
How to Update the PATH Environment Variable for the JDK
Oracle designs the JDK installs so that developers are not required to set the PATH environment variable. Alternatively, it can be set to allow the commonly run JDK executable files to be run from any directory on the computer. These tools include the Java compiler- javac.exe, the JRE – java.exe, javadoc tool – javadoc.exe, etc. If the PATH variable is not set, then the fully qualified path will have to be entered for the Java executable files on every invocation. For example, without the PATH variable being set, one would have to enter the following at the command line to run the compiler on a single Java source code file:
C: “C:Program FilesJavajdk1.7.0binjavac” TechFaq.java
Step 1 – Select the “Start” button followed by choosing the “Control Panel” and “System” program icons.
Step 2 – Select the “Advanced” and “Environment Variables.”
Step 3 – Input the location of the “bin” folder of the JDK installation for the PATH variable in the “Systems Variables” location. For example, the PATH entry on a Windows computer may look similar to:
C:WINDOWSsystem32;C:WINDOWS;C:Program FilesJavajdk1.7.0bin
*Note: The Windows PATH variable represents one to many directories that are separated by semicolons. The entries are not case sensitive. Windows computers will check the PATH entries from left to right. There should not be two entries for the JDK bin in the PATH at any one time. If there are, any after the first entry will be ignored. Once the PATH variable is set, the command window will need to be closed before it will take effect.
How to Uninstall the JDK
Sometimes it can become necessary to remove or uninstall legacy versions of the JDK on your computer.
Step 1 – Ensure you are logged in to your computer with an account that has administrator permissions.
Step 2 – Select the “Start” menu button and choose the “Control Panel” icon.
Step 3 – Click the “Programs” and “Programs and Features” menu options.
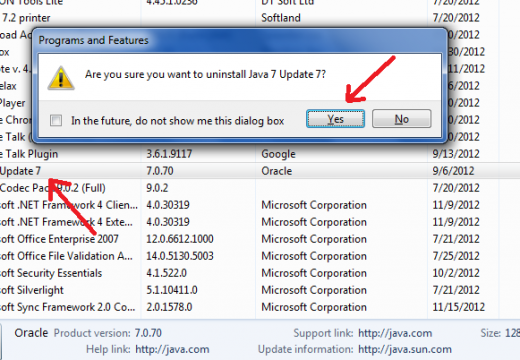
Step 4 – Choose the JDK that you desire to uninstall. Then, select the “Uninstall” menu button.
Step 5 – Enter the administrator password if prompted to do so by Windows.
Step 6 – Accept the default menu prompts if any are displayed to proceed with uninstalling the JDK.
How to Uninstall the JDK on Windows 8
Step 1 – Ensure you are logged in to the computer with an account that has administrator permissions.
Step 2 – Right click on the Windows screen at the bottom-left corner.
Step 3 – Choose the “Control Panel” menu option from the subsequently displayed pop-up menu.
Step 4 – Choose the “Uninstall a Program” menu option from the “Programs” category.
Step 5 – Choose the JDK program to uninstall.
Step 6 – Select the “Uninstall” menu button for JDK.
Step 7 – Select the “Yes” menu button to confirm uninstall of the JDK.
JDK Installation Troubleshooting Tips
Unfortunately, some end-users can run into issues when attempting to install the JDK. Some of the commonly encountered problems include: Corrupt Cabinet file, System Error During Decompression,
Program Cannot Be Run in DOS Mode, Private Versus Public JRE, Creating Source Files in Notepad, and
Characters That Are Not Part of the System Code Page.
How to Fix the Corrupt Cabinet File Problem?
A common error that can be encountered when installing the JDK is the “Corrupt Cabinet File” error. If you receive this during an attempted installation of the JDK, then the downloaded installation file is corrupted. You should verify the file size against that listed on the Oracle website. If the sizes did not work, then try downloading the file again. If they do, then you may need to download the installation file from another resource.
How to Fix the System Error during Decompression Error?
The “System Error During Decompression” error indicates that there is not enough room on the hard drive. Specifically, the space on the drive that contains the “TEMP” directory. You should confirm the hard drive resources, free space, and try again to resolve the error.
How to Fix the Program Cannot be Run in DOS Mode Error?
If you encounter the “program cannot be run in DOS mode” error, then the following steps should be taken to resolve the issue:
Step 1– Open the MS-DOS command prompt
Step 2 – Right-click the title bar of the wind and select the “properties” menu option.
Step 3 – Select the “Program” menu tab and select the “Advanced” menu button.
Step 4 – Make sure the “Prevent MS-DOS-based programs from detecting Windows” menu option is not selected.
Step 5 – Click the “OK” menu button twice and then exit the MS-DOS command prompt.
Step 6 – Restart your computer and the problem will be resolved.


Follow Us!