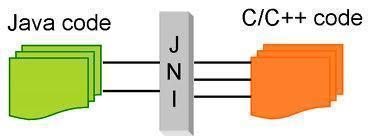
The JNI (Java Native Interface) is a layer of Java that permits code executing or running in the JVM (Java Virtual Machine) to invoke and to be called by native libraries and applications written in other languages. The JNI is most commonly used with the C++, C, and Assembly programming languages. Typically, code developers will use the JNI to write methods that are natively able to manage situations where the program cannot fully be developed in the Java programming language. For example, when standard Java class libraries are not able to support a given program library or platform-dependent features, the use of JNI may be appropriate. Additionally, JNI can also be used to modify existing programs that are written in another programming language in order to make them accessible to additional use or manipulation by Java programs.
Java Standard Library Dependencies on JNI
A number of the standard Java class libraries rely on JNI to provide the desired functionality to the developer and ultimately the end-user. Some examples include the ability to file input and output operations, sound, and video interoperability with the underlying operating system. By including platform specific functionality in the standard library, Java programs are able to access these capabilities in a platform-independent way. Prior to making the decision to use the JNI in a project, the prudent code developer or architect should ensure the same capability is not already a part of core Java to avoid potentially redundant and less optimized re-work.
What is the Purpose of the JNI?
The JNI is designed to allow code developers to incorporate native programming code methods or functions into Java applications when all required tasks cannot be handled fully within Java. A second use of the JNI is for developers to be able to modify existing programs that are written in another programming language in order to allow the program to be accessed by a Java program. Additionally, a number of the standard Java class libraries rely upon the JNI to provide the required functionality to the end-user and/or code developer.
What Does the JNI Framework Do?
The JNI framework allows native code methods to use Java objects similar to how core Java code does. When invoking the JNI, a native method will be able to create Java objects, inspect them, and use them to conduct tasks. When Java was still fairly new in the programming world, some would refer to use of the JNI as the programmer’s “escape hatch.” This nickname came from the ability of code developers to add functionality to Java programs that was not inherent in the Java API. JNI has and can be used to interface with other programming language code to include programs written in C++ and C. JNI can also be used to conduct time-critical operations such as solving mathematical equations by avoiding the additional memory overhead executing in Java bytecode entails for this type of computer operation.
How Does the JNI Work?
The JNI implements functions in separate .cpp or .c files. When a Java Virtual Machine (JVM) invokes the desired function, a JNIEnv pointer, jobject pointer, and all other Java arguments declared by the applicable Java method will be passed. A typical JNI function may look like the following:.
JNIEXPORT void JNICALL Java_ClassName_MethodName (JNIEnv *env, jobject jobject)
{
//Implementation of a native method
}
In this method call, the env pointer will be the stricter that contains the primary interface to the Java Virtual Machine (JVM). It will include all functions that are required to work with Java objects and to interact with the JVM. Some of the common JNI functions are to convert native strings to or from Java strings, converting native arrays to or from Java arrays, throwing exceptions, and instantiating objects. JNIEnv has the ability to allow the code developer to access most of the Java functionality.
Native code can access JVM features through calling JNI functions. These are made available to the native code through an interface pointer which points to an array of pointers. Each of the pointers in the array then points to a specific interface function which is located at a predefined offset inside of the array. Native methods are able to receive the JNI interface pointer as an argument. The JNI guarantees that the JVM will pass the same interface pointer to a native method when making multiple calls to the method from the same thread in Java. If a native method is called from different Java threads; however, it may receive different JNI interface pointers.
JNI Data Type Mapping
The JNI allows for direct data type mapping between primitive types such as characters and integers. For arbitrary Java objects, the data types are passed by reference. Although there are a number of data types which are interchangeable such as jiint and int, there are several that will cause a crash of the JVM if used improperly. For example, if you use a jstring when a char * is appropriate in C, the code will likely crash the JVM.
The following depicts the data types that map between Java and the underlying OS:
| Java Type | Native OS Type | Description of Data Type |
| boolean | jboolean | Unsigned eight bits |
| byte | jbyte | Signed eight bits |
| char | jchar | Unsigned 16 bits |
| short | jshort | Signed 16 bits |
| int | jint | Signed 32 bits |
| long | jlong | Signed 64 bits |
| float | jfloat | 32 bits |
| double | jdouble | 64 bits |
| Void | Void | n/a |
What are the Pitfalls of using the JNI?
Directly implementing the JNI in a Java application can be challenging for the average code developer. The following are some of the common pitfalls associated with using the JNI for Java programming projects.
JNI Makes Programming Difficult to Debug
Programmers can unintentionally introduce subtle errors while invoking the JNI that can result in the JVM becoming destabilized in ways that are challenging to debug or even reproduce in an analytic manner.
Loss of Platform Portability
Any Java application that relies on invoking the JNI loses its capability to run the same Java code on multiple platforms. Although a workaround can be to develop separately implemented JNI code for each desired platform, this still results in having to create multiple builds of the application and to detect and deploy the specific code tailored to the detected OS.
Lack of Automatic Garbage Collection for Non-JVM Resources
Another drawback to the use of JNI is that there is not automatic garbage collection included in the framework for non-JVM memory resources that are allocated by native code. As a result, all native code must maintain responsibility for releasing any memory resources that are acquired during code execution.
Signal Handling Issues on Linux and Solaris
If one is implementing the JNI on the Linux or Solaris operating systems, the native code implementation can intercept signals intended for the Java Virtual Machine (JVM) in error if registering as a signal handler. As a result, signal chaining is a better option to use on these platforms to better let the native code work with the installed JVM.
CPU / FPU Generated Software Interrupts Must Be Handled
When using the JNI on the Windows platform, SHE (Structured Exception Handling) has to be used to wrap the native code in the appropriate try and catch code blocks. This will ensure that interrupts such as NULL pointer access violations and divide by zero operations will not result in an unhandled exception and cause the program to crash.
Encoding for Various UTF Methods are not Standard UTF-8
Unfortunately, the actual encoding for the following functions are not in standard UTF-8:
NewStringUTF, GetStringUTFLength, ReleaseStringUTFChars, GetStringUTFRegion, and GetStringUTFChars, For these functions, both codepoints equal to or greater than U+10000 as well as NULL are encoded in modified UTF-8. As a result, within the JNI, programs should make use of the following functions that return information in UTF-16 (little endian) format:NewString, GetStringLength, GetStringChars, GetStringRegion, GetStringCritical, ReleaseStringChars, and ReleaseStringCritical.
Steps to Access the Windows Registry from Java
A common issue for Java developers who work on or deploy applications to computers running the Windows OS is to access the Windows Registry from within a Java program. Unfortunately, there is not an embedded library in the core Java libraries that includes this functionality. By using JNI; however, developers can both access the Windows Registry as well as modify environmental variables if required.
Step 1 – Download the JNI Registry Library if not already resident on your computer. Once the zip file is downloaded, the supporting JAR and other files will need to be saved to the Java code repository or directory located on your computer.
Step 2 – Launch the IDE (integrated development environment) used for Java code development on your computer.
Step 3 – Select the appropriate menu option to create a new Java class file from the file menu of the IDE.
Step 4 – Include the appropriate JNI registry class files at the top of the Java class files. These import statements will be in addition to any other Java class files that you need to include for the Java class.
For example:
import com.ice.jni.registry.Registry;
import com.ice.jni.registry.RegistryException;
import com.ice.jni.registry.RegistryKey;
import com.ice.jni.registry.RegistryValue;
Step 5 – Make a new Registry and RegistryKey class instance in the file. Once the instances are created, the registry subkey can be opened to modify within the Java programming code.
For example:
Registry myTECHFAQRegistry = new Registry();
Registry myTECHFAQRegistryKey= Registry.HKEY_CURRENT_USER;
Registry myTECHFAQKey = registry.openSubkey(myTECHFAQRegistryKey, “Software\\Microsoft\\CurrentVersion\\Explorer\\Advanced”,RegistryKey.ACCESS_ALL);
Step 6 – Now, obtain access to the key value to the registry setting to be modified and change the value of the key value. The registry modification operation has to be done within a try/catch programming block in Windows in the event the Registry Exception is thrown by the program.
For example:
try {
RegsitryValue myTECHFAQRegistryValue= myTECHFAQKey.getValue(“ok”);
myTECHFAQKey.setValue(“Test TECH FAQ Value”, myTECHFAQRegistryValue);
myTECHFAQKey.deleteValue(“ok”); }
catch(RegistryException reEx) { //Appropriate exception handling code would go here
}
What is SWIG?
SWIG is an interface generator for the C and C++ programming language libraries that is capable of generating JNI code. The primary function of the software project is to make the process of invoking native functions written in C++ or C easier by other programming languages. The project accomplishes this task by allowing the programmer to create an interface file that will be made visible to the interpreter. SWIG will then create the conversion code for the functions that have basic arguments while conversion code for complex types has to be authored by the code developer.
The SWIG application tool also produces the source code that will serve as the “glue” between the C/C++ native source and the targeted language; in this case Java through JNI. The “glue” consists of a shared library that can be linked to by programs written in Java. The SWIG project has been in development since 1996 and is available for use under the GNU General Public License. The latest version of the software project now allows export of the parse tree in both XML and Lisp formats.


Follow Us!