Sound information that passes through computer speakers can easily be something that one wishes to keep as a recorded piece to use for later. This is a great option to have when one wishes to be able to playback the sound on a different device such as a mobile phone or mp3 player.
The simplest answer may seem to be to use a microphone to record the audio. While this option essentially works, it provides very low quality recording with a great deal of distortion.
It is entirely possible to record the audio from computer speakers in order to play back later at a much higher quality with the following methods:
Using the Audacity Audio Editing Software
Note: This option is recommended as it is free software that is available for the majority of the most used operating systems.
In order to physically and manually record sound into files on a computer, use the Audacity software. This software provides accesses to a wide variety of audio editing tools that can easily make recording audio from the speakers possible.
Once the software and the appropriate accessories such as the LAME MP3 encoder have been installed, media can be saved in MP3 format.
1) Open the volume mixer’s drop down menu to choose the Wave Out or Stereo Mix options for the input source. In Windows 7 and Vista, the settings can be opened through the task bar notification area. Right clicking the speaker icon will provide these options:
- Open Volume Mixer
- Playback Devices
- Recording Devices
- Sounds
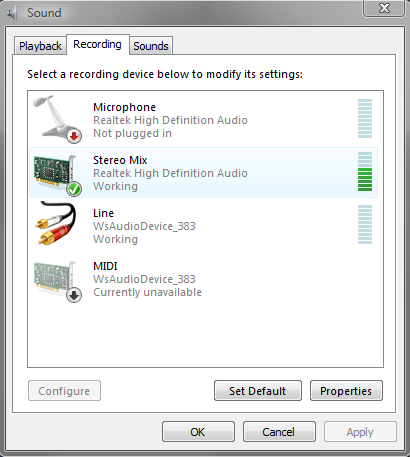
2) Select the “Recording Devices” option and an options window similar to the following:

Image: Example of possible input sources. Sound was being played to show active devices.
Clicking on the “Stereo Mix” option is required for the example configuration, then clicking on the “Set Default” button designates the device as the default.
3) Once this is completed, click the red “Record” circular button within the Audacity software. Audacity will begin recording audio, which is played from the source set as the default.
4) Once a recording has been completed, click the “Stop” square button.
5) Export the sound into the sound file by selecting the “File” tab then selecting the file type that the sound will be exported as, then provide information about how one would like to encode the audio for the final processing.
Note: Unless the computer has a specialized sound card, recordings will only be made in “Mono” mode. Stereo sound cannot be captured through speaker playback.
Windows Sound Recorder
Windows has built in sound recording software that is available within the accessories folder and is easily accessed from the start menu.
The same steps for enabling the recording input should be taken for Windows Sound Recorder.
1) Right click the volume mixer icon to show the following options:
- Open Volume Mixer
- Playback Devices
- Recording Devices
- Sounds
2) Select the “Recording Devices” option.
Clicking on the “Stereo Mix” option is required for the example configuration, and then clicking on the “Set Default” button designates the device as the default input source.
3) Once this is completed, select the “Start Recording” button to record any sound that is made through the system including music, video, or general sound card output.
4) Once the recording has completed, select the “Stop Recording” button to halt the recording process.
5) A “Save As” window will immediately appear, designate a name for the recording inside it. The file format that the sound records into is “.WMA” or Windows Media Audio, which Windows and several applications and audio playback devices can use. One can specify the artist or album information when saving the file to the system.
Wondershare Streaming Audio Recorder Software
Note: This option is not free but provides a free trial to test the software before purchasing it.
This option uses a virtual sound card that can be routed to work with the computer speaker configuration. This works by using the virtual sound card as the recording input device, which is automatically configured to work with the Wondershare Streaming Audio Recorder software. The sound being played back is then routed through this virtual sound card and recorded with the program when set to start recording.
To start recording:
1) Open the Wondershare Streaming Audio Recorder application and run it.
2) Select the “Start Recording” button then open the program that will be providing the sound to record from.
3) Start the sound playback and the Wondershare Streaming Audio Recorder will begin to record audio until the audio is complete.
Once complete, the Wondershare Streaming Audio Recorder program will cut the file and encode it into an MP3. The Gracenote ID3 tags are automatically generated for the user to provide information about the songs, such as the artist, title, and genre to better organize music content. The user can also insert manual tags.
This makes it much easier to record audio from various sources and it is not limited to sound coming from a web browser. Recording music, voice messages, video game sound, and anything else is simplified through Wondershare product use.
Apple Macintosh Recording
It is possible to record audio from speakers with an Apple Macintosh computer with the help of an application. An available software option is Audio Hijack Pro, which greatly simplifies recording audio that the system plays back. Any sound that the system makes can be recorded with this software.
Note: The Audio Hijack Pro software is not free. One must purchase the software in order to use it.
The Audio Hijack Pro software can be easily configured to save recordings to any location on the system. The format and file information can also be customized as necessary.
Available encoding options for the Audio Hijack Pro include:
- WAV
- MP3
- AAC
- AIFF
- Apple Lossless
The software also has a wide range of tools that can be used to work with the audio captured while in use.


Follow Us!