If you have a business website set up at Bluehost, then you can easily link the same to Google Apps (Free) to create business email addresses like yourname@businessname.com and use other collaborative/productivity tools offered by Google.
Creating a business email address definitely gives your clientele and stakeholders a more professional and authentic experience.
Follow the below steps carefully to link your website hosted at Bluehost with Google Apps (Free).
At Bluehost
Step 1: Log into your Bluehost cPanel. Under the Domains section, select DNS Zone Editor. Select the domain on which you’d like to setup Google Apps.
Step 2: Under Zone File Records > A (Host), you will see a host record named mail. Delete it.
Step 3: Under Zone File Records > MX (Mail Exchanger), delete all existing entries.
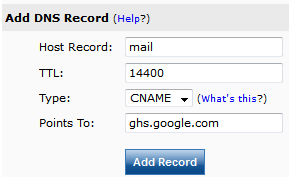
Step 4: Now, add the following entries from the Add DNS Record section.
| Host Record | TTL | Type | Points To | Priority |
| 14400 | CNAME | ghs.google.com | – | |
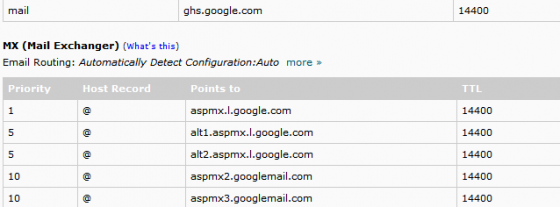
| @ | 14400 | MX | aspmx.l.google.com | 1 |
| @ | 14400 | MX | alt1.aspmx.l.google.com | 5 |
| @ | 14400 | MX | alt2.aspmx.l.google.com | 5 |
| @ | 14400 | MX | aspmx2.googlemail.com | 10 |
| @ | 14400 | MX | aspmx3.googlemail.com | 10 |
The changes should look like this:
Note: Changes in these records may take up to 48 hours or more to propagate throughout the Internet.
That’s it at the Bluehost side.
At Google Apps
Step 1: Go to Google Apps (Free) signup page. You will be asked to enter a domain name that you’d like to use with Google Apps. Enter the domain (e.g. businessname.com – do not include www) and click Submit.
Step 2: Next you will be asked to create a credential. Enter the username and password. Remember, this credential will have administrative rights at Google Apps, and hence should be noted immediately.
Note: Since, this will be an email with administrative rights, I recommend creating it as admin@businessname.com to have a centralized administrative control.
Step 3: Fill out the information about your business/organization. The alternate email address is very important. It will be used for communication and account recovery. Click I accept! Create my account to proceed.
You will receive a confirmation email at the alternate email address you had provided during the signup.
Step 4: Choose Go Express to easily configure the account. Go Custom is intended for big businesses or who are already using some other email software at the moment. The configuration wizard is quite self explanatory.
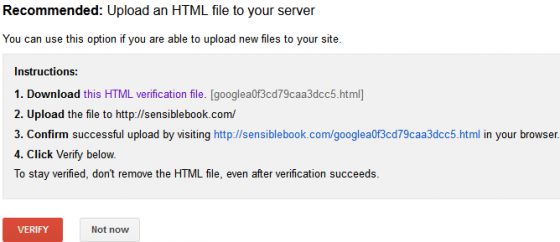
Step 5: Verify domain ownership is the very first step during configuration. The Upload an HTML file to your server method is used for domain verification. That is, download the specified HTML file and upload it to the base folder of your website. Click Verify.
Step 6: In the Users and Group section, you can create groups or add more users. The free version allows maximum of 10 users.
Step 7: In the Set up Gmail, choose Google servers (recommended) only.
Step 8: In the Did you change your MX records? screen, select Yes.
Go through rest of the wizard, which shows not-so-important and informative sections, by clicking Next.
Step 9: Go to Settings > Email. Under Web address, click Change URL. Enable the custom URL and enter mail in the provided text box. Click Continue. Click I’ve completed these steps (as we have already set up Bluehost).
Doing this will give you a URL like http://mail.businessname.com, from where you can log in and is easier to remember too.
You can now access http://mail.businessname.com to access your business email addresses. But do give it at least 48 hours for the MX Entries to update across the Internet.
A new user can be added from Organization & Users > Create a new user.
I hope creating business email addresses will give your business more credibility and authenticity.
If you faced any trouble while connecting Bluehost with Google Apps, please mention the same in the comments below.


Follow Us!